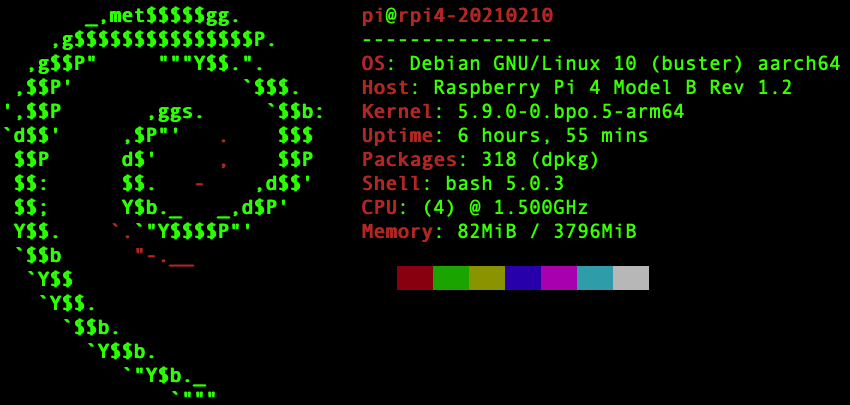
Neofetch snapshot of the installed OS
Download Image and Confirm Authenticity
Unzip the Image
Flash SD card
This is a quick walktrhough / notes on how to install Debian on a Raspberry Pi 4.
Download Image and Confirm Authenticity
First step is to download the appropriate compressed image, sha256sum, and GPG-signed sum, from here⤴. These are the exact links I used Build Date: 2021.02.10; Release: 10 (Buster) Pi-Family: 4
xz-compressed image⤵️
sha256sum⤵️
GPG-signed sha256sum⤵️
Or you can use wget to download the resources:
wget ‘https://raspi.debian.net/verified/20210210_raspi_4_buster.xz.sha256’;
wget ‘https://raspi.debian.net/verified/20210210_raspi_4_buster.xz.sha256.asc’;
Confirm the Checksum of the Image
The next step is to confirm the integrity of the download. To do this we run the shasum command to compare the downloaded checksum to the downloaded file.
The checksum is GOOD ✅ if you get a response like:
20210210_raspi_4_buster.img.xz: OK
But if the checksum is BAD ❌, then you will get a result like this:
20210210_raspi_4_buster.img.xz: FAILED
shasum: WARNING: 1 computed checksum did NOT match
Confirm Authenticity of the Checksum
This next step confirms the authenticity/integrity of the checksum itself by checking the GPG signature. This is done by importing the author’s public GPG key and using that to check the authenticity of the checksum. The web interface to search for maintainer’s GPG keys is here⤴. Search for a first name: Gunnar; last name: Wolf. You can then copy-paste the GPG key into your GPG Keychain application or save it as a file and import it using the command line.
gpg –import gwolf_gpg_public_key.asc
Now that you’ve imported the key, you can confirm that it is indeed imported using the gpg –list-keys command.
If you have other keys in your keychain (most likely), then you’ll see all those as well. However at the bottom you should see some output that looks similar to this:
pub ed25519 2019-11-22 [SC] [expires: 2023-09-30]
4D14050653A402D73687049D2404C9546E145360
uid [ unknown] Gunnar Wolf <gwolf@gwolf.org>
uid [ unknown] Gunnar Wolf <gwolf@debian.org>
uid [ unknown] Gunnar Eyal Wolf Iszaevich <gwolf@iiec.unam.mx>
sub ed25519 2019-11-22 [A] [expires: 2021-09-30]
sub ed25519 2019-11-22 [S] [expires: 2021-09-30]
sub cv25519 2019-11-22 [E] [expires: 2021-09-30]
The next step is to actually confirm that the shasum was signed by the Debian Developer, to confirm the signature use the following command.
If the signature is good (and it should be), then it will say Good signature. However if the key has not been signed by yourself as trusted (which we haven’t done), then it will give a warning of sorts. The output should look something like this:
gpg: Signature made Wed Feb 10 14:22:05 2021 CST
gpg: using EDDSA key 60B3093D96108E5CB97142EFE2F63B4353F45989
gpg: Good signature from “Gunnar Wolf <gwolf@gwolf.org>” [unknown]
gpg: aka “Gunnar Wolf <gwolf@debian.org>” [unknown]
gpg: aka “Gunnar Eyal Wolf Iszaevich <gwolf@iiec.unam.mx>” [unknown]
gpg: WARNING: This key is not certified with a trusted signature!
gpg: There is no indication that the signature belongs to the owner.
Primary key fingerprint: 4D14 0506 53A4 02D7 3687 049D 2404 C954 6E14 5360
Subkey fingerprint: 60B3 093D 9610 8E5C B971 42EF E2F6 3B43 53F4 5989
gpg: WARNING: not a detached signature; file ‘20210210_raspi_4_buster.xz.sha256’ was NOT verified!
Unzip the Image
Install xz
The image is compressed using xz. I didn’t have it installed so I had to install it via my package manager.
sudo apt install xz-utils
# — CentOS / Fedora / RHEL —
yum install xz
# — MacOS —
brew install xz
Now simply unzip the compressed image.
Flash SD card
Determine which /dev/disk? is your SD card
The next step involves writing the image to the disk/card. I prefer just doing it simply using the dd command versus installing some other tool. However determining which /dev device on your system is the SD card is a bit tricky. The best thing to do is to save a list of all the devices before plugging it in, and then saving a list after plugging it in and comparing the two files.
# Plug in SD card with reader and wait like 10 seconds
ls /dev > dev_after.txt
diff dev_init.txt dev_after.txt
The disk number and the number of partitions will suredly vary. Plugging in my SD card had the following output. The main takeaway is that the SD card is /dev/disk2 in this case.
29a30,32
> disk2
> disk2s2
> disk2s5
In addition on MacOS, you can just use the diskutil list command to see descriptions of all the connected disk devices. Here’s what the results show for the flash drive after finishing this whole process.
/dev/disk2 (external, physical):
#: TYPE NAME SIZE IDENTIFIER
0: FDisk_partition_scheme *32.0 GB disk3
1: Windows_FAT_32 RASPIFIRM 313.5 MB disk3s1
2: Linux 31.7 GB disk3s2
For the rest of this tutorial the device will be referenced as disk?, making sure that you substitute the ? with your actual device number, e.g. 2. These text files can be discarded now that you know which device number is your SD card that will be used to flash the Raspberry Pi.
Unmount the Disk
In order to do any work on the disk, then it first must be unmounted.
# — MacOS — sometimes the disk won’t unmount, use the diskutil command instead
sudo diskutil unmountDisk /dev/disk?
Format the disk
I formatted my SD card as FAT32, you could probably use other formats, but I haven’t bothered to try yet. In addition, you may need to install mkfs as it may not be on your system by default
sudo mkfs -t FAT32 /dev/disk?
# — MacOS —
sudo diskutil eraseDisk FAT32 DiskNameGoesHere /dev/disk?
Write the Image
Now to writ the image directly using the dd command. The latter options bs, oflag, and status are purely optional, but give you an idea of what’s going on with the data copy. On MacOS, however the dd command is not the GNU one, so it doesn’t have these options. The good news is that you can install the GNU utilities by running the command brew install coreutils. This packages includes the dd command aliased to gdd as to not conflict with the system install, as well as some other tools like GNU grep aliased as ggrep (MacOS grep doesn’t have the -z [null terminated input option] and it drives me up the wall). This process will take a bit, probably about 5 minutes.
sudo dd if=20210210_raspi_4_buster.img of=/dev/disk2 bs=64k oflag=dsync status=progress
# — MacOS with coreutils —
sudo dd if=20210210_raspi_4_buster.img of=/dev/disk2 bs=64k oflag=dsync status=progress
# — MacOS system dd —
sudo dd if=20210210_raspi_4_buster.img of=/dev/disk2
Final Checks
The process is now finished and you’re ready to use this SD card as a bootable drive for the Raspberry Pi. If you want to check the card before trying that, you can mount it and check to see that the files were written. If you ls the mounted disk, you should see some dat files and other files. If you did mount it to check the results of the data copy, be sure to umount it before removing the physical card.
sudo mkdir -p /mnt/sd-card
sudo mount -t FAT32 /dev/disk? /mnt/sd-card
# — MacOS —
diskutil mount /dev/disk?
# You’ll probably need to try this once or twice to get the write boot partition. On my computer it was disk2s1
# Unmount the disk before ejecting
sudo umount /dev/disk?
Congratulations! You did it. 👍
Quick step-by-step guide to installing Debian 10 on a raspInstalling Debian 10 on a Interactive, sortable table using only HTML and CSS
rpi, pi, linux, debian, install
Rickifact.com


