
 Max Headroom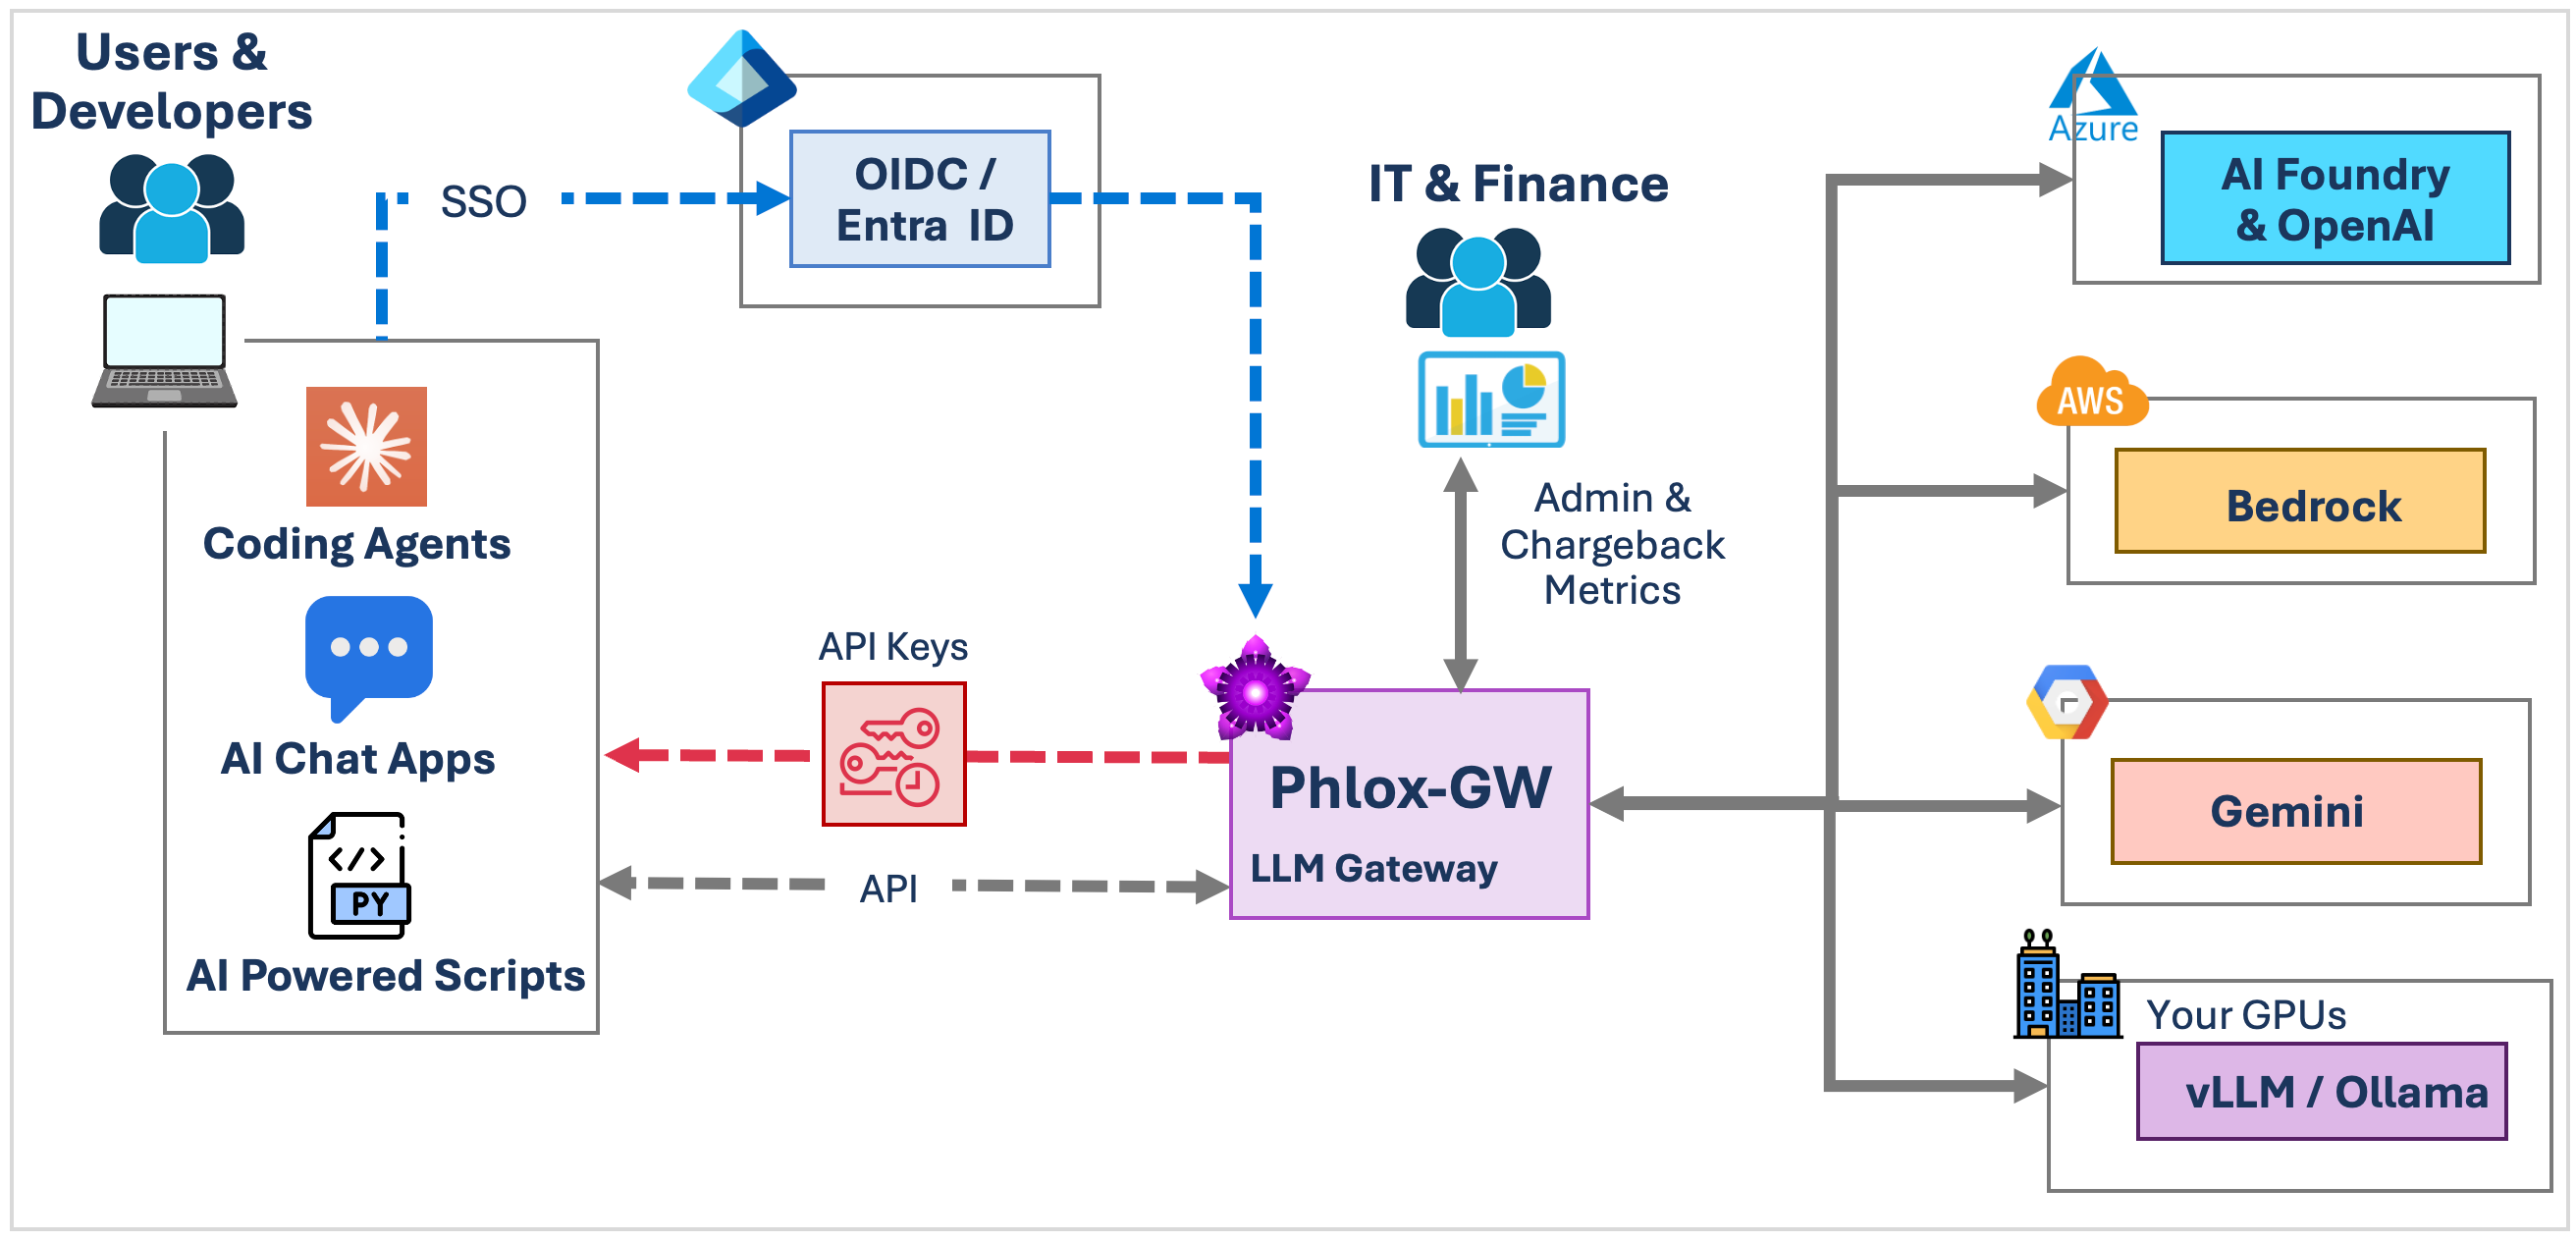
A new open-source LLM gateway with enterprise features, without the enterprise paywall
Introduction
In this article I’m going to introduce Phlox-GW (Phlox Gateway) a new LLM gateway that I created. There’s no shortage of LLM gateways on the market but the open-source (open-core) options all seem to eventually move the most important features to their “enterprise” license. Features such as:
- Cost accounting to enable user and department level chargebacks
- Budget enforcement to prevent over spending
- SSO, OIDC/EntraID support
- Guardrails / PII redaction
- Auditing, logging, Prometheus & OpenTelemetry
- High availability and scale out clustering
- User, department, provider and model rate limiting
- Model & provider load balancing, routing and failover
Without those features the gateway is only usable in home labs and personal projects. I get why companies do it, but I wanted a full featured gateway that I could easy self-host and deploy as I need without needing to worry about licensing. So I created Phlox-GW, which is a fully open-source LLM gateway where those “enterprise” features will stay free forever; no rug pulls. It gives you the operational controls to run shared LLM infrastructure across teams, over multiple model providers, through one consistent gateway. Phlox-GW provides OpenAI and Anthropic endpoints and does full protocol translation between the clients and providers. It lets you use Claude Code and other clients and applications with models from any provider.
Phlox-GW is a single binary available for macOS, Linux (WSL), and Windows. You can start small with a single instance and SQLite database, or scale to a multi-node cluster with shared PostgreSQL database.
This article will provide a quick tour of Phlox-GW, an installation guide and some examples of using the gateway.
NOTE: It’s worth noting that the “-GW” extension exists because I have a sister product named Phlox that’s a full ChatGPT like AI platform. The Phlox AI Platform can be used in conjunction with Phlox-GW.
Phlox-GW Interface Tour
Before I cover installation and some example uses of the gateway, I’ll provide a quick tour of the UI and features of the product.
Operations dashboard
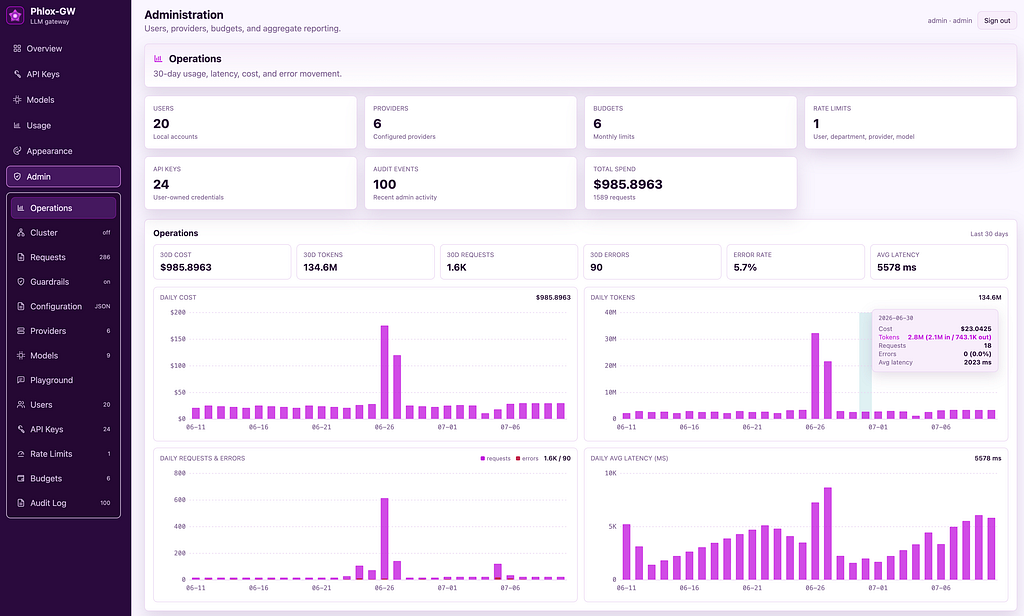
The image below shows the operations dashboard that’s available to users assigned an admin role. It gives you high-level metrics such as the number of users, configured providers, api-keys, events, and total spend. There are graphs that track the daily costs, daily tokens consumed, requests, errors and average latency over the past 30 days:
Cost and budget monitoring
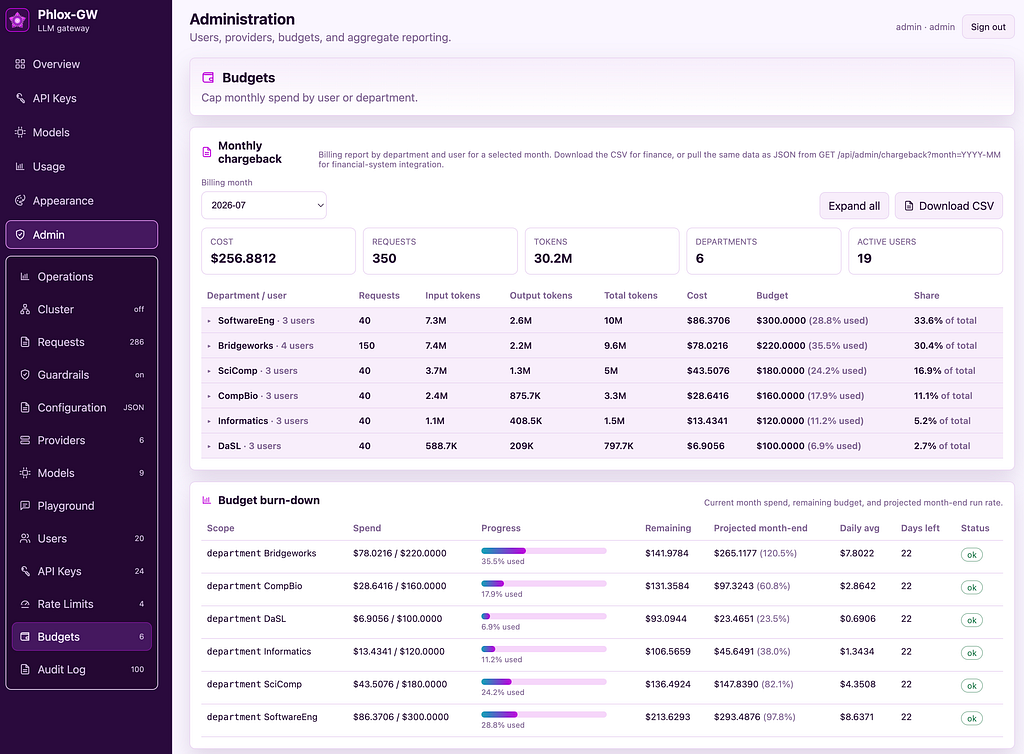
This is one of the major reasons that I created Phlox-GW. I needed a way to track spend at the user and departmental level for chargebacks and cost controls. Monthly budget limits can be assigned to both individuals and departments. Users are tagged with their department name and their costs rollup to their assigned department. When user or department reaches the configured warning threshold of their assigned monthly spend limit, they will receive a warning, when they reach or exceed their spend limit, they will no longer be able to use models that have costs associated with them. They will either need to wait until the next billing cycle, or request that their spending limit is increased to continue using models that are assigned a cost:
Rate Limits
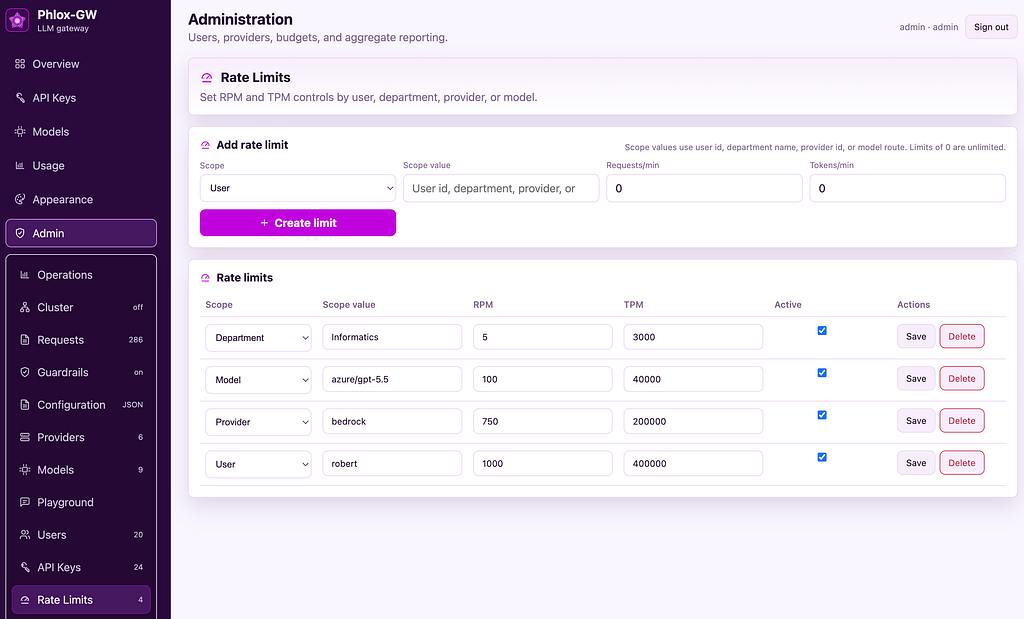
Administrators can assign rate limits to users, departments, providers or models. Rates can be Requests Per Minute (RPM), and/or Tokens Per Minute (TPM).
HA and Scaling with Clustering
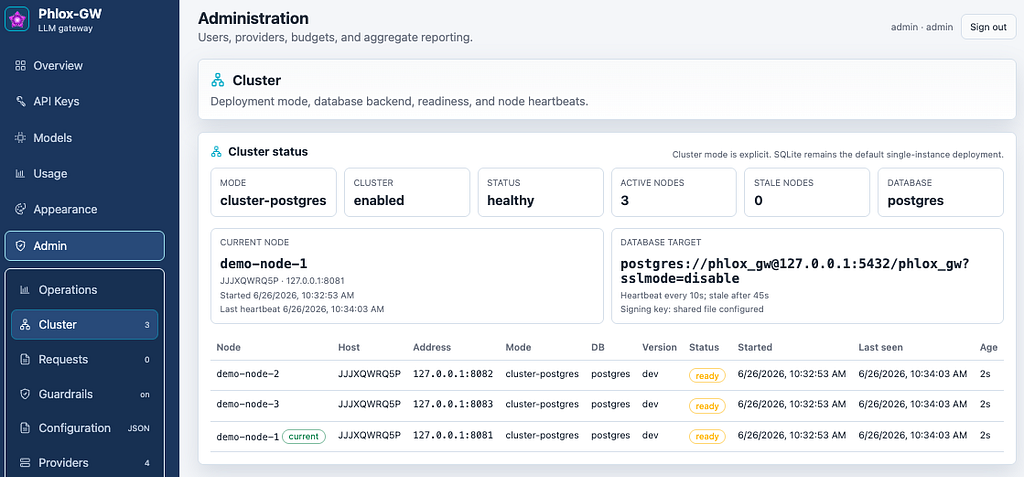
Phlox-GW is written in Go so a single instance should get very good performance when used with a PostgreSQL database. But if you need availability, or need to scale to many thousands of concurrent sessions, phlox-gw supports horizontal scaling by adding more instances with a shared PostgreSQL database server. To achieve HA with a multi-node cluster, you need to put a network load balancer (NLB) in front of the cluster with health checks to remove unhealthy nodes from service:
Auditing
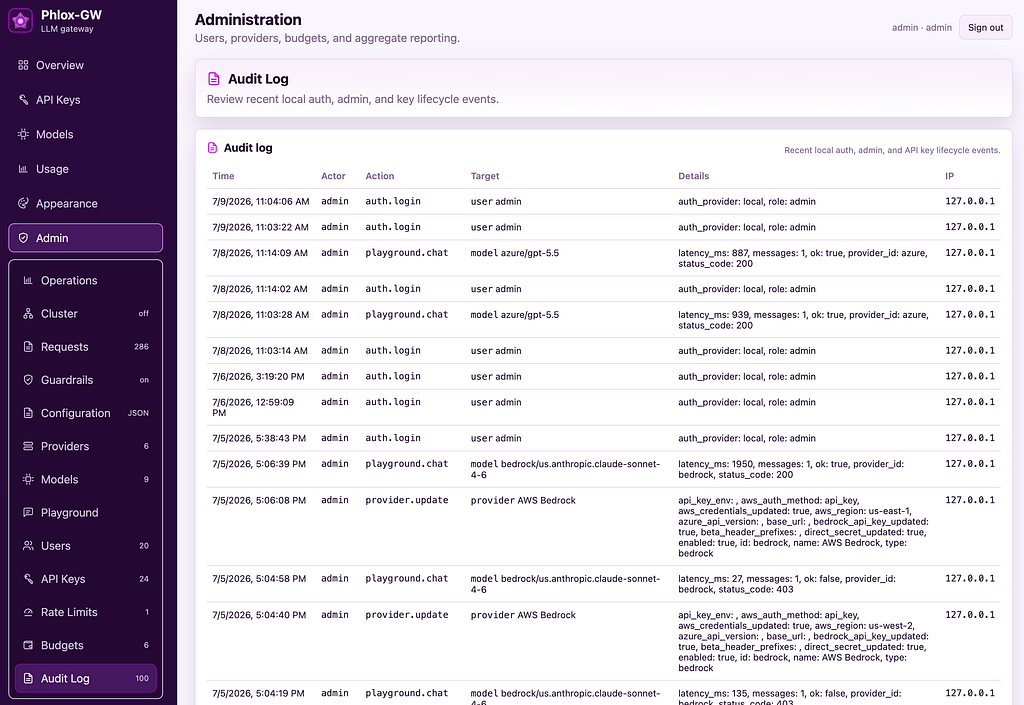
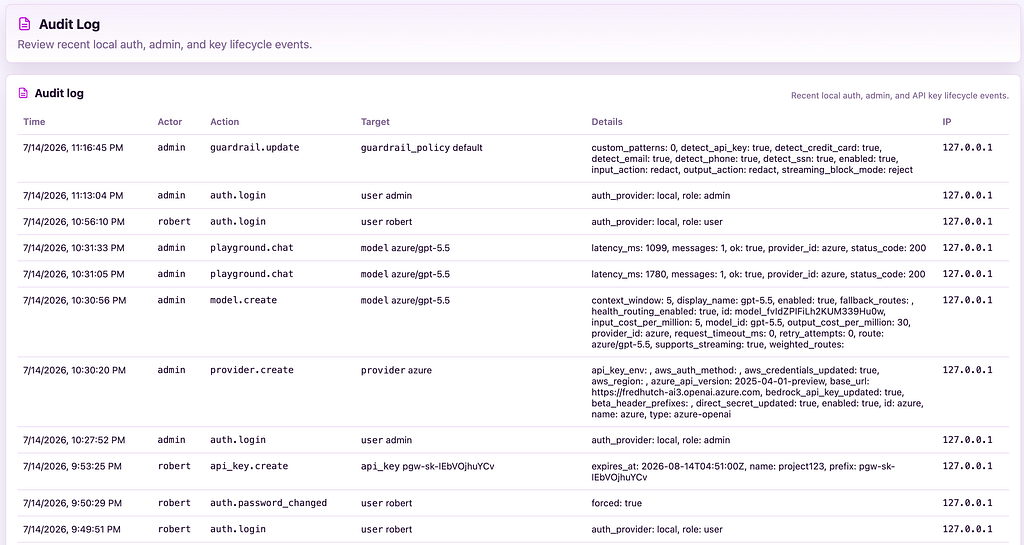
Phlox-GW has an audit log that logs all logins, and configuration changes and actions in the web UI that logs the time, user, action, target, details and the IP address:
Privacy Preserving Request logging
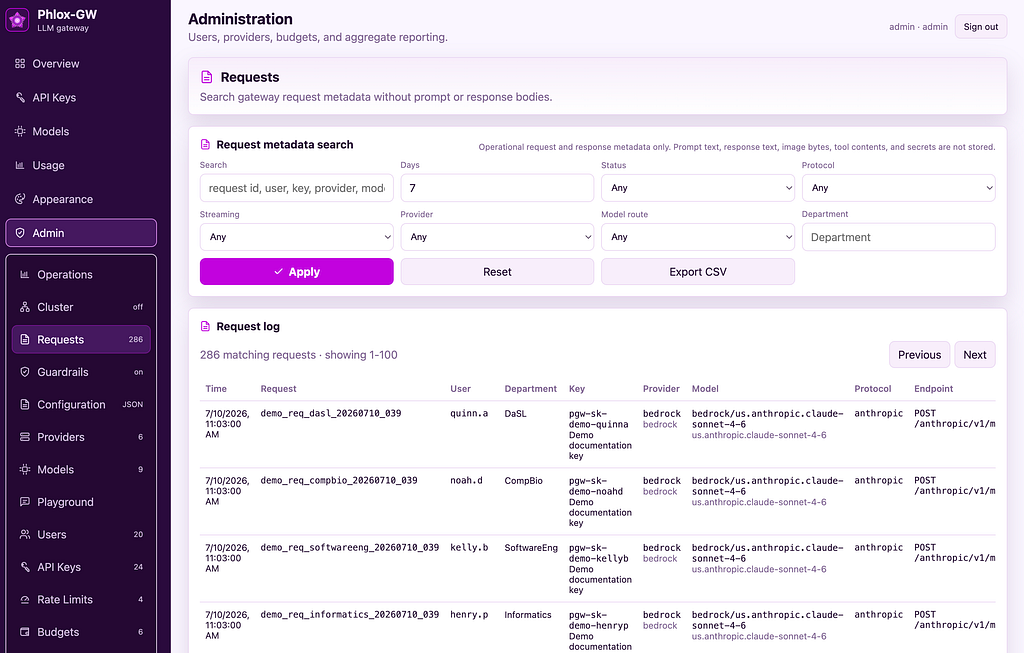
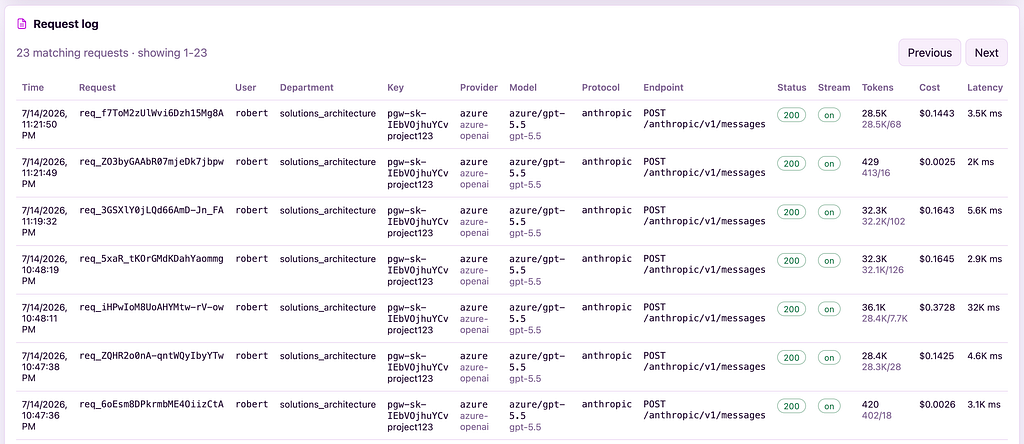
All requests through the gateways endpoints are logged. The time of the event, request ID, the user, department, what API key was used, what provider, model, protocol and endpoint. The contents of prompt and the response from the LLM are never logged, only the request’s metadata, so users content stays private:
Guardrails / PII Redaction and Blocking
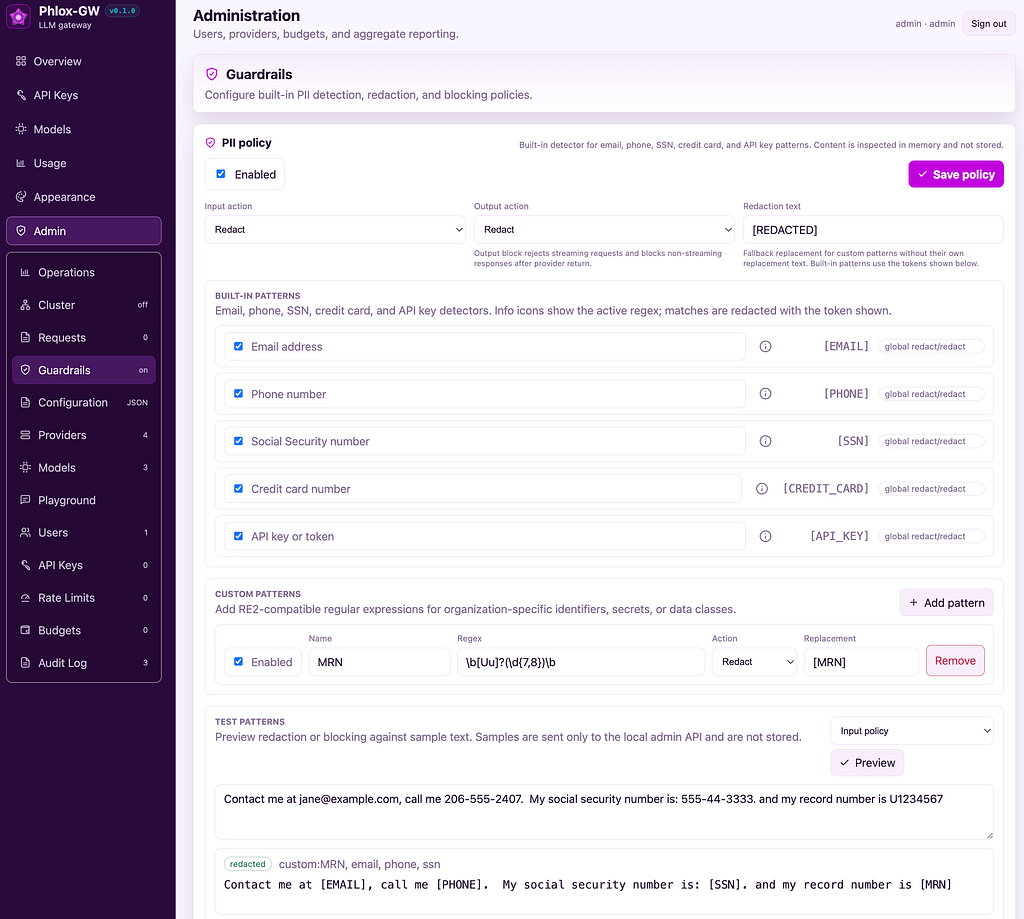
Phlox-GW has a guardrails middleware that currently just has a simple sensitive information redaction system that can either redact text, or block messages completely when configured patterns are enabled. Redaction or blocking can happen on the input to prevent sensitive information from being sent to the LLM provider (keep it from leaking your organization), and/or redacted or blocked when returning from the LLM before your users can see it. There are some canned PII regex patterns such as email, phone numbers, social security, credit card and API keys, but you can add your own custom patterns. The UI lets you test the configured patterns against input text so you can verify they work:
Self-Service API Keys
Authenticated users can mint named API keys and set optional expiration date/times on each key. They can revoke keys and see when they were last used:
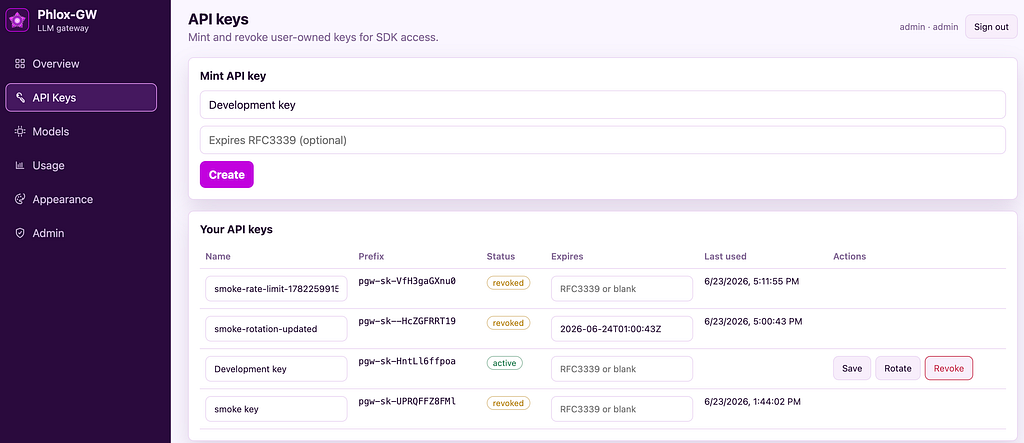
Not shown here, but there’s also an API key management panel available to administrators where they can see all user keys, assign budgets and rate limits to them, and revoke them. The full key value in only shown once when a user creates them and are not visible to users or admins after creation.
Self-Service Usage Monitoring
Authenticated users can track their individual usage metrics in the UI, including the number of API requests they’ve made, total number of input and output tokens, and the total costs of all priced models. They can also see the breakdown in spend by model:
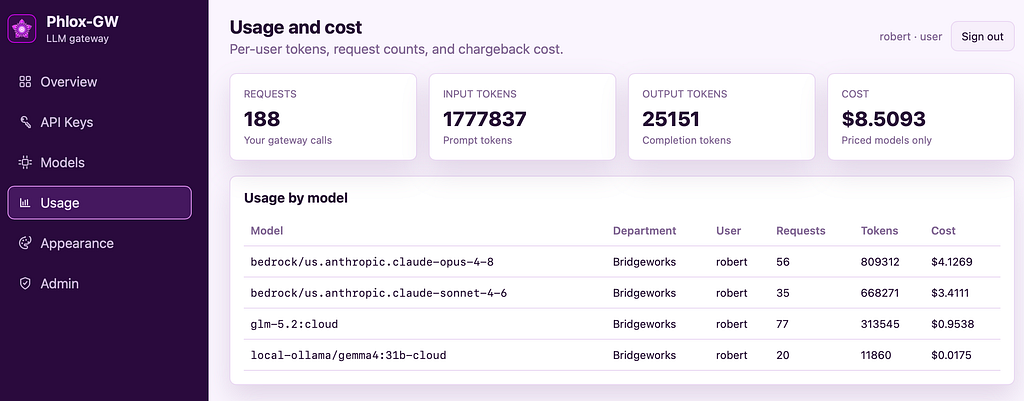
There are more panels in the web UI than I’ve covered here, but this should be enough to give you a good idea what Phlox-GW is. There will be some additional screenshots of panels in the next sections that cover installation and configuration.
Installing Phlox-GW
In this section, I’ll cover installing, and configuring Phlox-GW. To run Phlox-GW on you workstation for testing and evaluation, there aren’t really any dependencies since Phlox-GW is provided as a single, self-contained binary, and creates and uses a SQLite database on first launch.
Note: If you want to build it from scratch, you’ll need the latest version of Go installed and npm to build the frontend. For production setups, you’ll want to use PostgreSQL for the database and need a reverse proxy such as Nginx or Caddy with an SSL certificate to encrypt the traffic.
For this article, I’ll just cover installing it in the simplest configuration on a using the default SQLite database. I’ll be using macOS but the same instructions will work for Linux and WSL. For more advanced production configurations, or installing on Windows natively (fully supported) consult the product detailed product documentation.
Phlox-GW can be downloaded and installed with a single command. By default it on macOS/Linux it will be installed to ~/.local/bin, but you can override that and install somewhere else (in your shell path) with the. –install-dir <DIRECTORY>” flag. This command will install it in the default location:
curl
  --proto '=https'
  --tlsv1.2
  -fsSL
  https://raw.githubusercontent.com/robert-mcdermott/phlox-gw/main/install.sh
  | sh
That command will ensure the target directory exists, then will download the latest release of the phlox-gw binary and the corresponding checksum file and will validate that the binary matches the releases checksum, and prints the next steps:
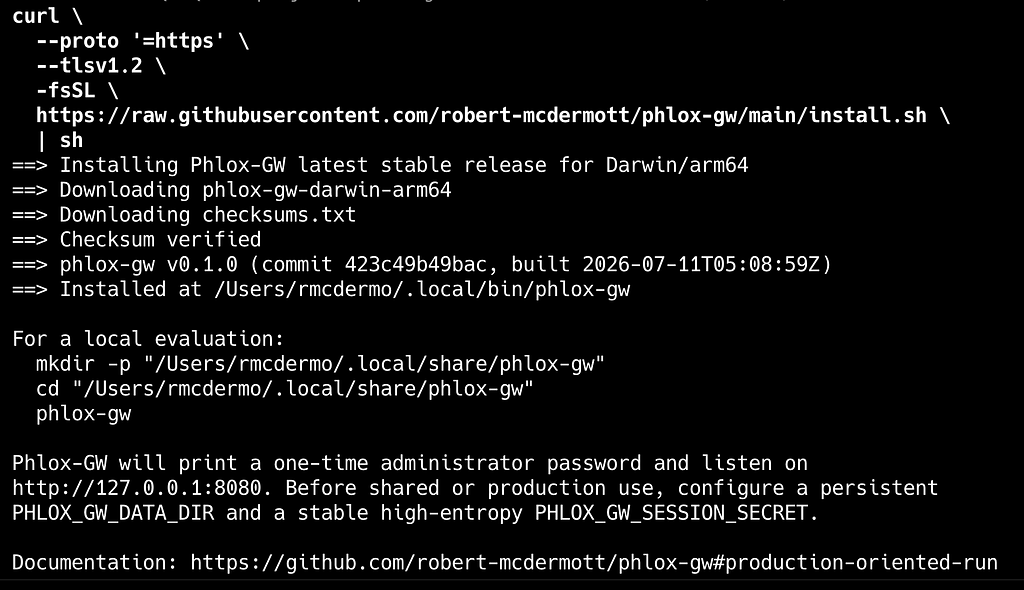
Create the location where you want the phlox-gw database to be created, change to that directory and then run the phlox-gw command. The output also provides a example of the commands to create a directory to store the database, but you can create the database anywhere you like:
  mkdir -p "/Users/<your-username>/.local/share/phlox-gw"
  cd "/Users/<your-username>/.local/share/phlox-gw"
  phlox-gw
The output of that command will look like the following. It will print the version with commit number, provide you the URL to the web console, tell you the deployment mode (sqlite, or postgres) and the path to the newly created database. It will also provide the temporary admin password:
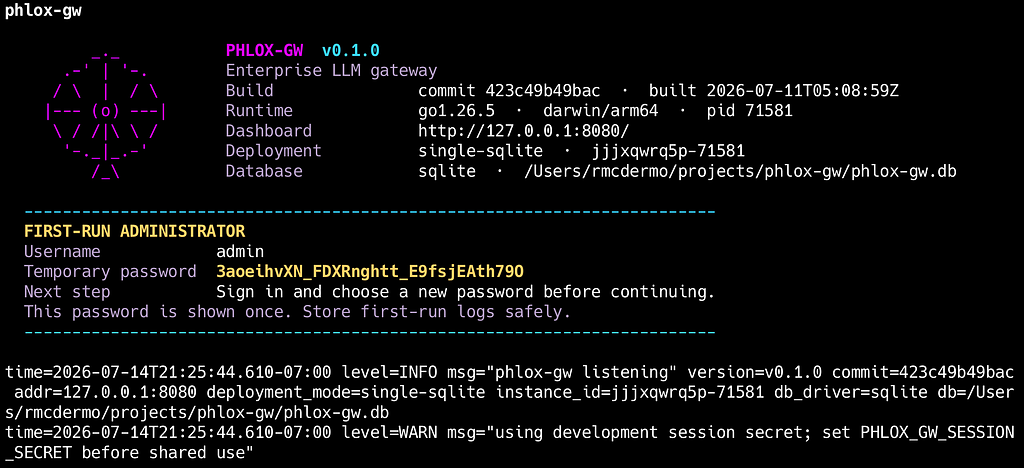
Navigate to the console URL (http://127.0.0.1:8080 by default), login with the provided temporary password and it will force a password change. The password must be at leaset 12 characters long:
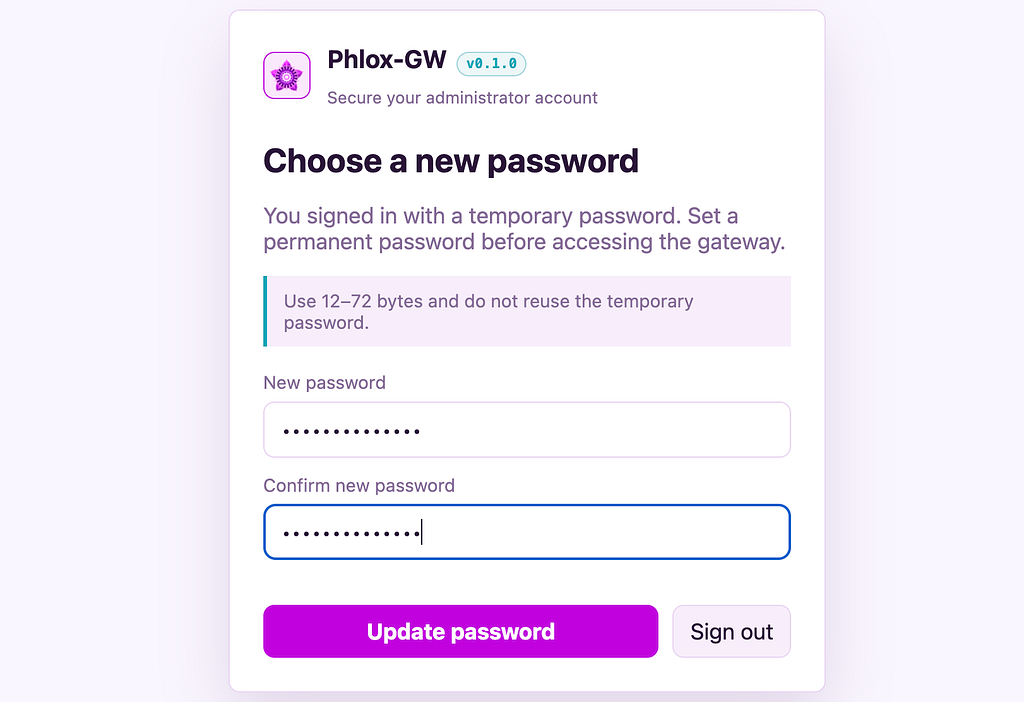
After the you’ve changed your password and logged on, you are read to move on to configuring the system.
Configuring Phlox-GW
Phlox-GW doesn’t have a configuration file, all configuration can be done via environment variables and/or the web UI. For this quick walk through I’ll be showing the web UI, but consult the documentation in the code repo for detailed configuration details.
Adding/configuring a provider
The first step will be to configure a provider. Go to the “Providers” panel in the admin section of the console. There will be some preconfigured providers as examples, but those will be disabled by default and can be deleted. Ollama is also preconfigured as a provider and is enabled, which we’ll used as an example, but if you don’t have Ollama installed or don’t plan on using it as a provider, it can also be deleted.
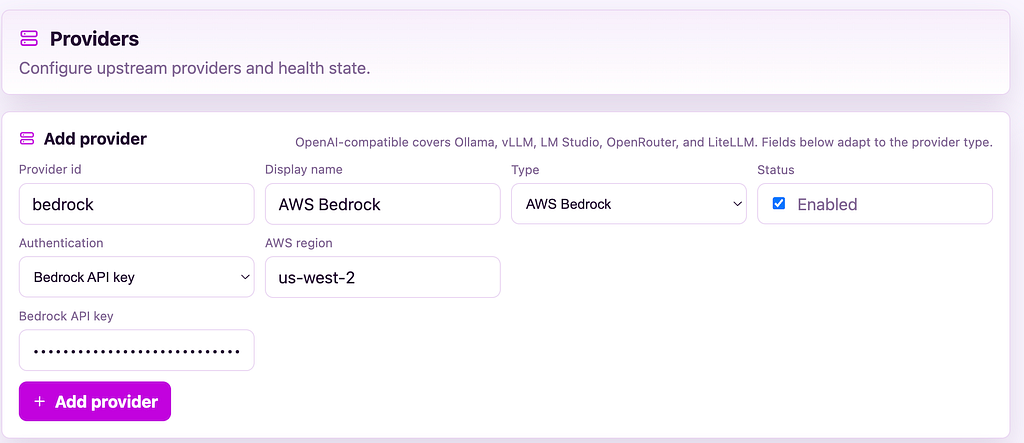
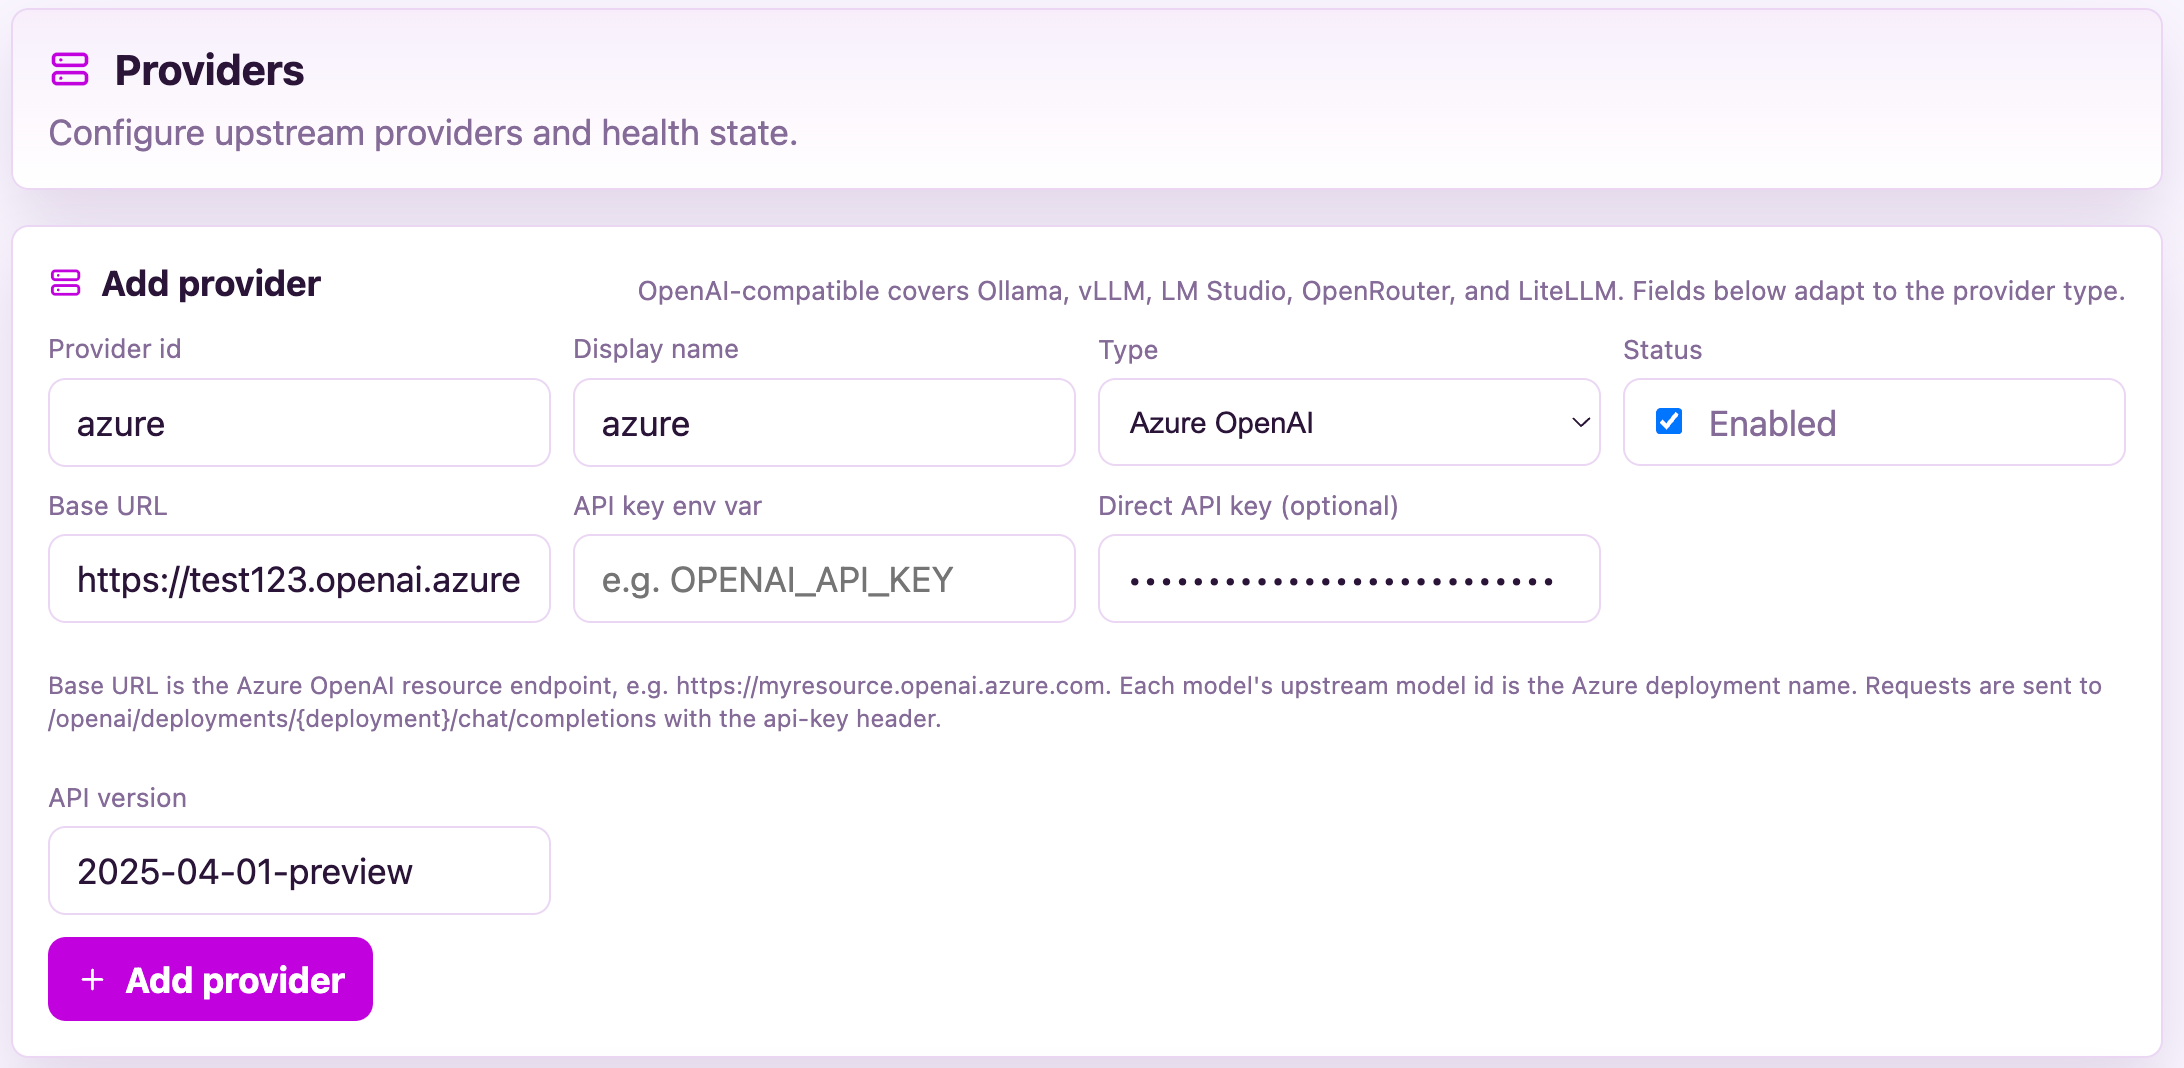
To add a provider, give it a “Provider ID”, a “Display Name”, and select what type of provider it is from the “Type” dropdown. After you select the provider type, the fields will change to match that provider types options. For example, if you choose AWS Bedrock, new “Authentication” dropdown will appear to select the authentication method (AWS API keys, Bedrock API key, or IAM role), and region.
Here’s an example of adding an AWS Bedrock provider with a Bedrock API key:
And here’s an example of adding an Azure OpenAI provider:
If you are just testing, and have Ollama installed locally, that’s a simple way to test Phlox as there’s no subscriptions or API keys to worry about, but it’s very helpful if you have an Ollama subscription to get a good amount of usage out of their cloud hosted models.
Adding and configuring a model
Now that you have a provider configured, it’s time to add a model. Go to the “Models” panel in the admin area of the console. For this example I’m adding a model from locally running Ollama provider. Select the provider you configured from the “Provider” dropdown, provide the model name in the “Upstream model ID” field, then assign an input, output and context price (usually the same as the input) price for 1M tokens. Enable it and click “Add model”.
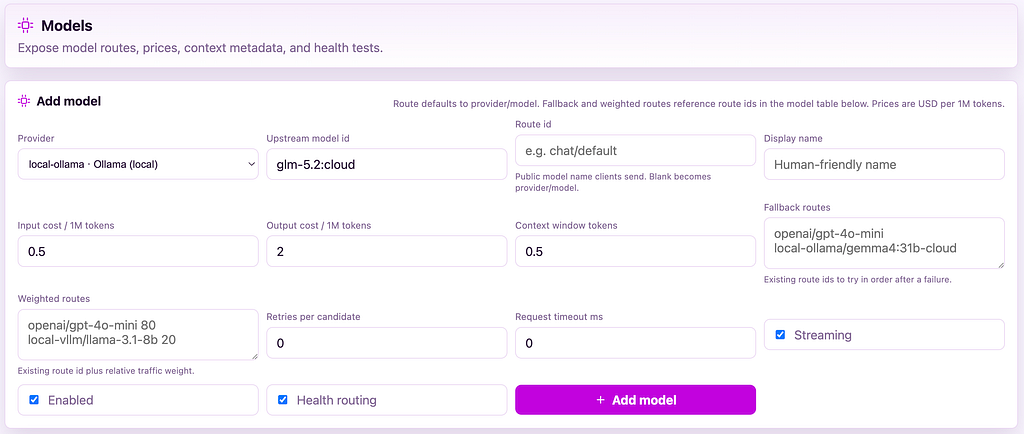
There are other fields such as “Route ID”, “Fallback routes”, and “Weighted routes” Those allow you to configure failover of a model and/or its provider to keep your user from experiencing a downtime, or doing load-balancing across multiple providers/models. See the documentation for more details on those options, but for now you can leave them blank.
Testing a provider & model in the Playground
After you’ve configured a provider and a model, you can go to the “Playground” to test that everything is working. In the playground, select the model route you want to test and ask it a simple question or just say hello. If everything is working, it should respond fairly quickly.
For example, below I’ve successfully tested the gpt-5.5 model via Azure OpenAI:
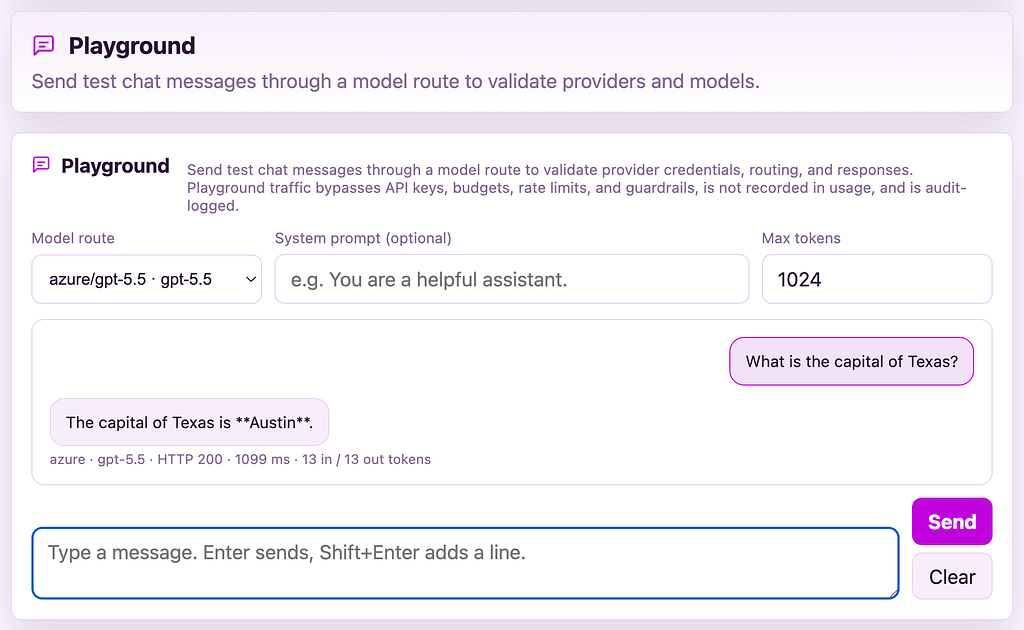
It’s worth noting that the playground communicates directly with the provider and model, and doesn’t pass through the cost accounting and guardrails layers, so you can’t use it to test that the cost accounting/budgets or PII redaction is working. For this reason the playground is only accessible to administrators.
If your provider/model worked, it’s time to add your first user.
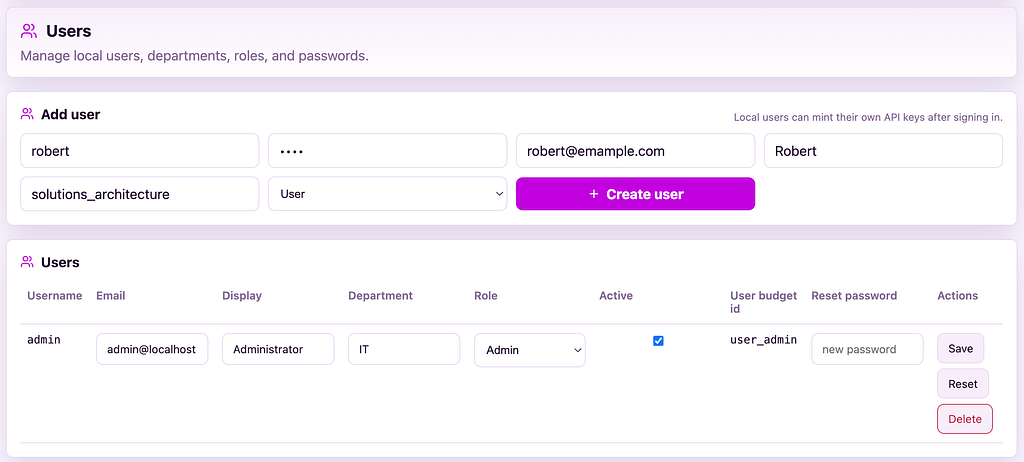
Adding users
To add a user, go to the “Users” panel and provide the user’s username, temporary password, email address, display name, department name, and whether the user is a regular user or an admin. New users will be forced to change the password that you set here on their first login. Consult the documentation for SSO/OIDC/EntraID setup if needed.
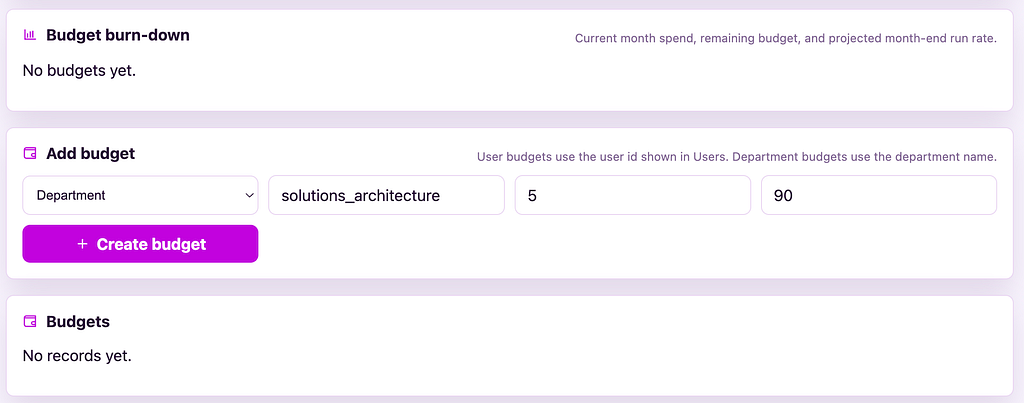
Creating budgets
To create a budget, go the “Budgets” panel, and select between a “User” or “Department” budget, provide the name of the user or department depending on the type of budget, then assign the monthly budget limit in $USD and set a warning threshold percentage:
If you’ve been following along and performed all the configuration steps, you are ready to use the system.
Using Phlox-GW
Now that Phlox-GW has been installed, configured and you have a user account now, it’s time to use it or test it from the user perspective.
Creating an API Key
After you log out from your admin account and log in as a regular user, the first thing you’ll want to do is to generate an API key so you can use the gateway. Give the API key a name, and set an expiration date (optional). Users can create and manage multiple keys and have the ability to revoke them before expiration if needed.
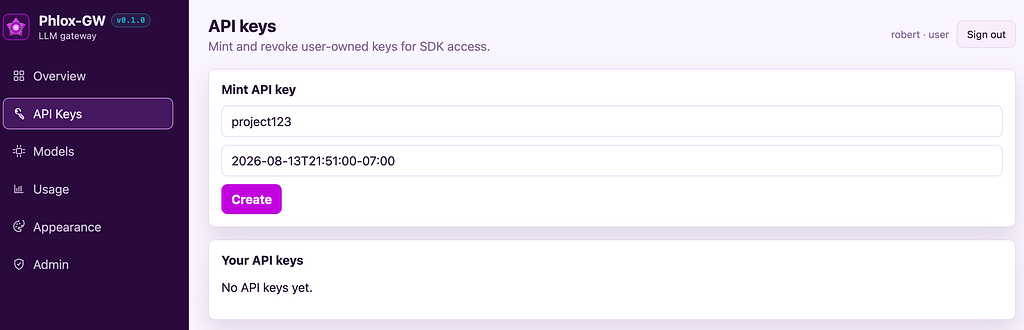
Make sure that you copy and save the API key somewhere as it will only show you the key value once, if you lose it, you’ll have to revoke that key and generate a new one.
Now that you have an API key, open a terminal session so you can test the phlox-gw endpoints.
Testing the gateway endpoints
Open a terminal and store your API key in an environment variable to use with later commands:
export PHLOX_API_KEY="pgw-sk-<rest-of-your-api-key>"
Now you can use curl to test the OpenAI compatible API endpoint (replace the model route, provider/model, with one that you configured):
curl -Ns http://127.0.0.1:8080/v1/chat/completions
  -H "Authorization: Bearer $PHLOX_API_KEY"
  -H "Content-Type: application/json"
  -d '{
    "model": "local-ollama/glm-5.2:cloud",
    "messages": [{"role": "user", "content": "What is the capital of France?"}],
    "stream": false
  }'
If sucessfull the output should look something like this:
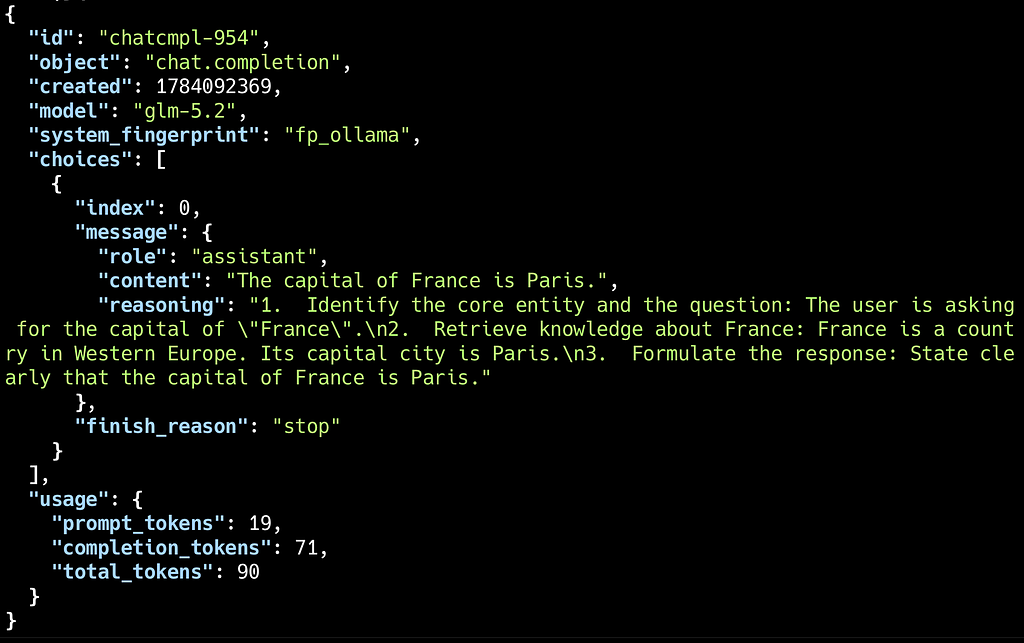
Now let’s test Anthropic compatible API endpoint:
curl -sS http://127.0.0.1:8080/anthropic/v1/messages
  -H "x-api-key: $PHLOX_API_KEY"
  -H "anthropic-version: 2023-06-01"
  -H "content-type: application/json"
  -d '{
    "model": "local-ollama/glm-5.2:cloud",
    "max_tokens": 64,
    "messages": [{ "role": "user", "content": "What is the capital of Texas?" }]
  }'|jq
If successful the output should look something like this:
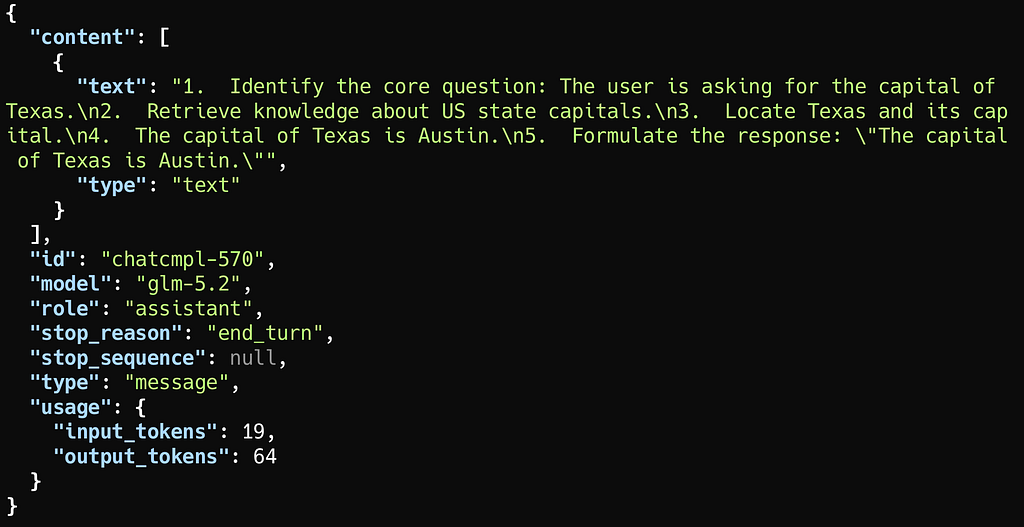
If both of those tests worked, everything is working correctly and you can now use the gateway with a real client or script.
Using Claude Code with Phlox-GW
Assuming you have Claude Code installed (if not install it if you plan to use it), run the following command in your terminal (make sure the phlox API key is still a configured environment variable beforehand) in an existing project or empty directory (adjust to match your provider/model):
env
  ANTHROPIC_BASE_URL="http://127.0.0.1:8080/anthropic"
  ANTHROPIC_API_KEY="$PHLOX_API_KEY"
  ANTHROPIC_MODEL="azure/gpt-5.5"
  claude
Claude should launch, and ask you about trusting the workspace/directory and it might also say something about using a third-party key, that’s OK and expected. If you run the /status command in Claude Code, you can see that it’s using the Phlox-GW endpoint and the provider/model that you configured:
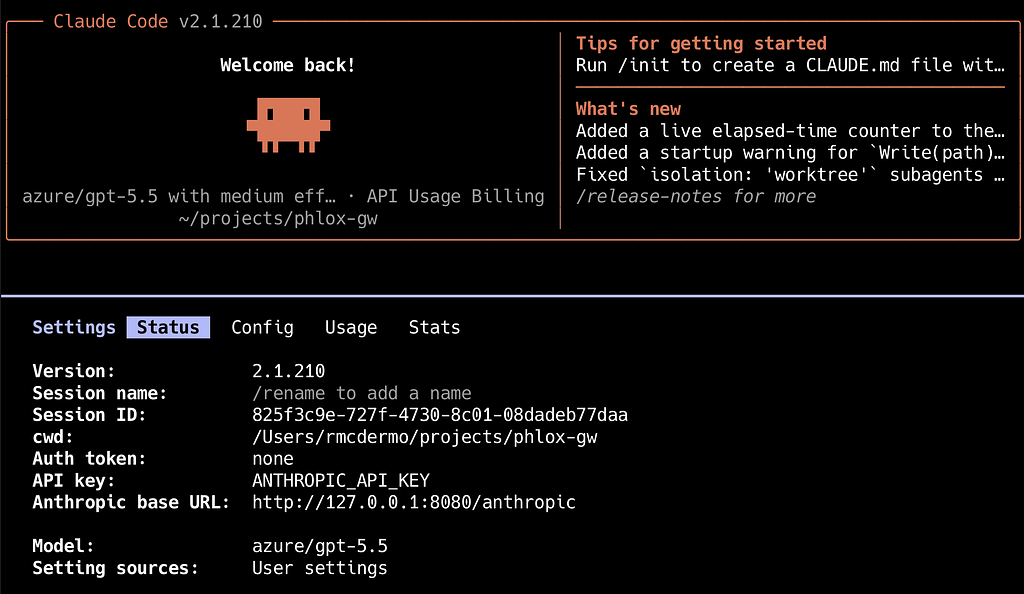
To test that it’s functioning correctly, have it create or review something. In the example below, I asked it to “create a simple asteroids game in a single html file”. It quickly created the requested game and provided some instructions to play it:
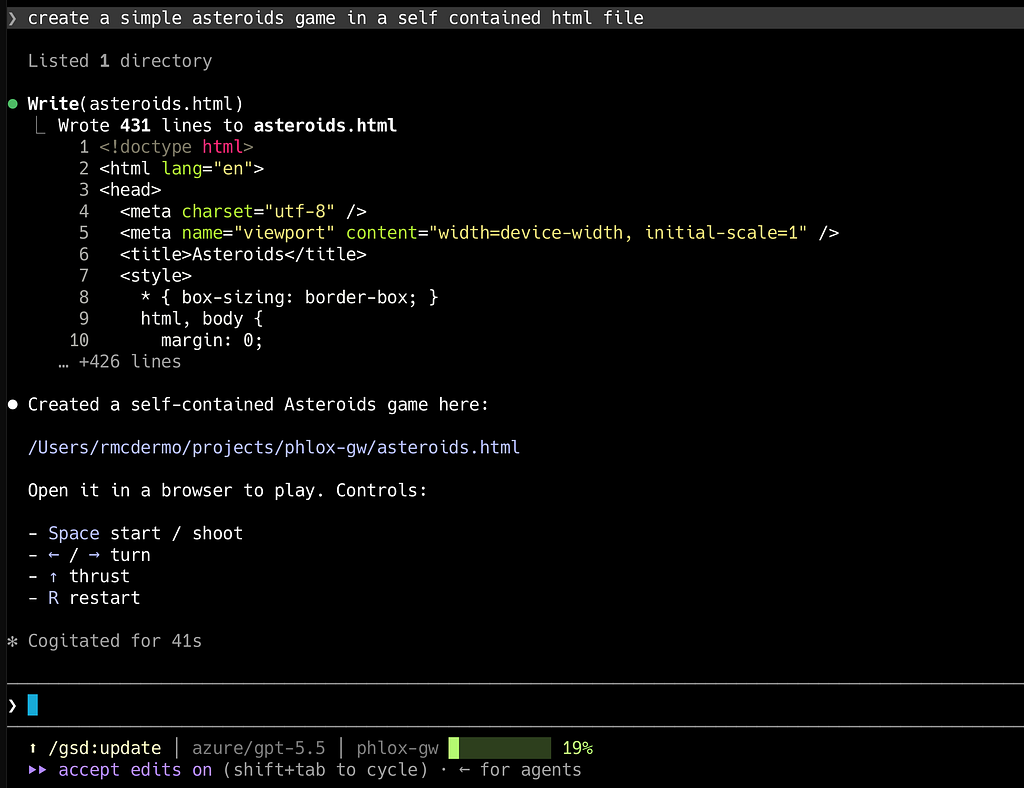
Opening the generated html file in a web browser presented a fully functional classic Asteroids game:
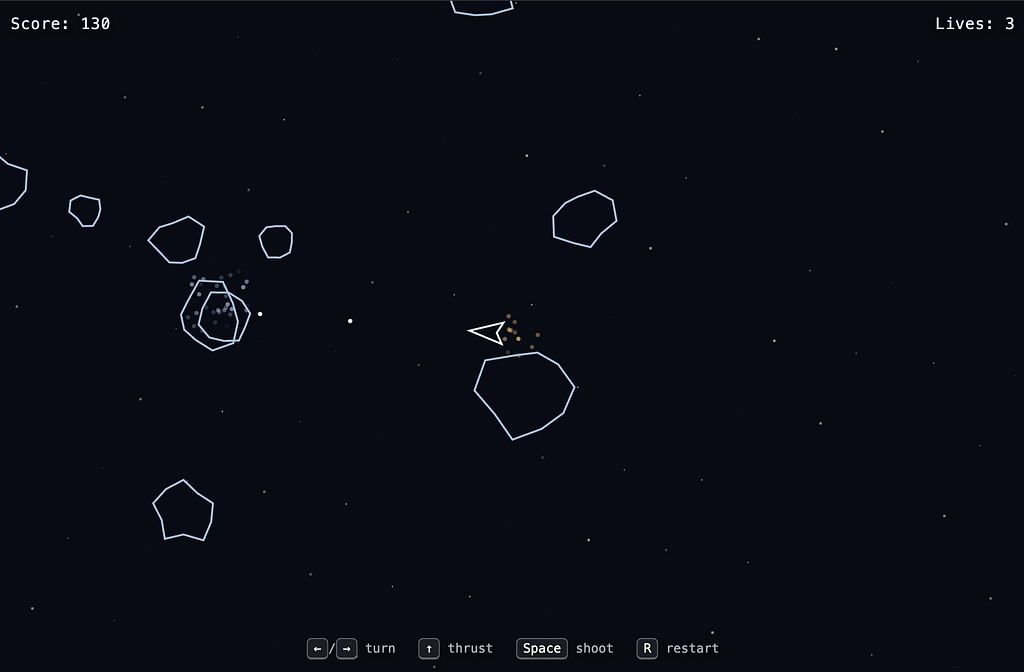
In this example (Claude Code leveraging Azure OpenAI), the Claude Code client is using its native Anthropic API protocol to communicate with Phlox-GW, and Phlox-GW is performing bi-directional protocol translation (Anthropic API to/from OpenAI API).
Checking your usage
Now that you, a regular user have tested phlox, used Claude Code or other client or script to do some work, you can go back to the phlox-gw web UI (as a regular user) and see how many tokens you’ve consumed, how much of your budget has been spent, and the token/cost breakdown by model:
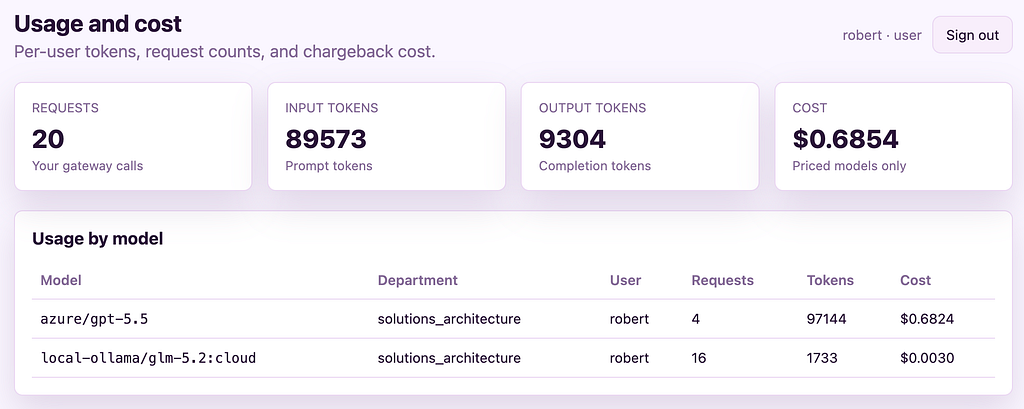
It looks like this Asteroids cost the “solutions_architecture” department $0.69 🚀
Monitoring usage and spend as an admin
If you log out of your user account and back in as an admin, you should see that there’s some data on the “Operations” dashboard now. You can see the total spend of all users, token consumption, requests/errors and the average latency of those requests. It will also provide you metrics breakdowns at both the provider and model levels:
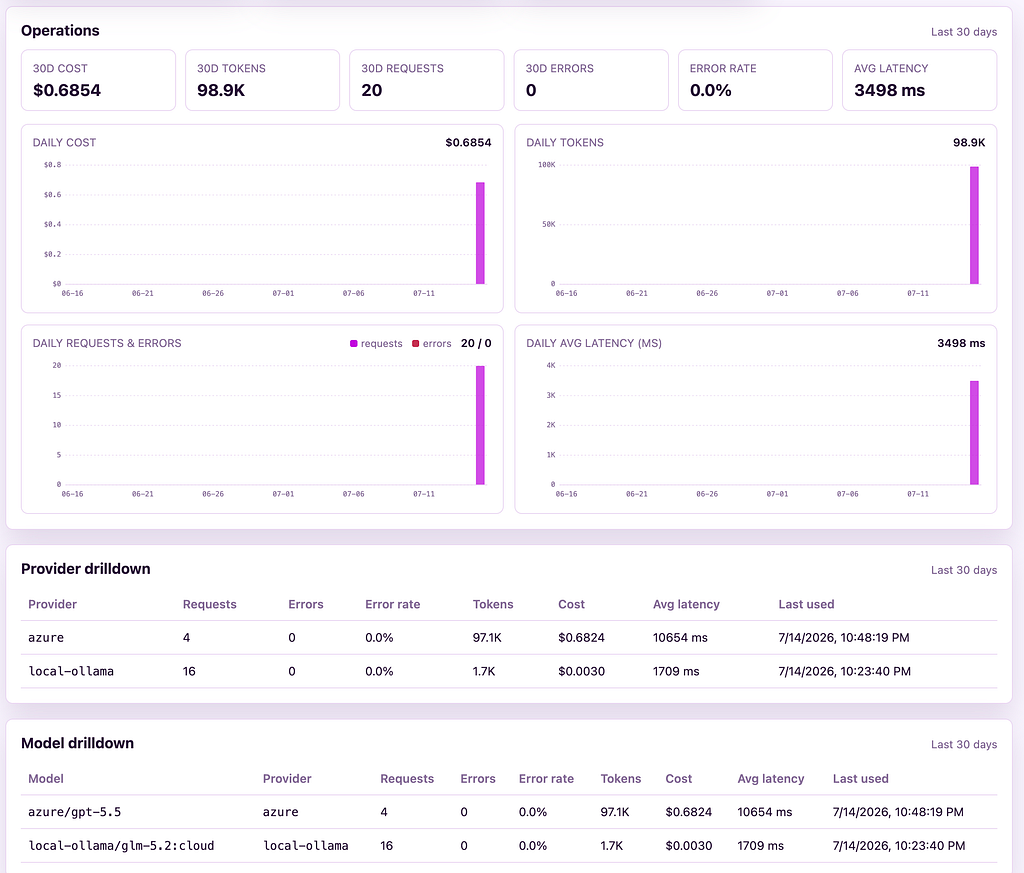
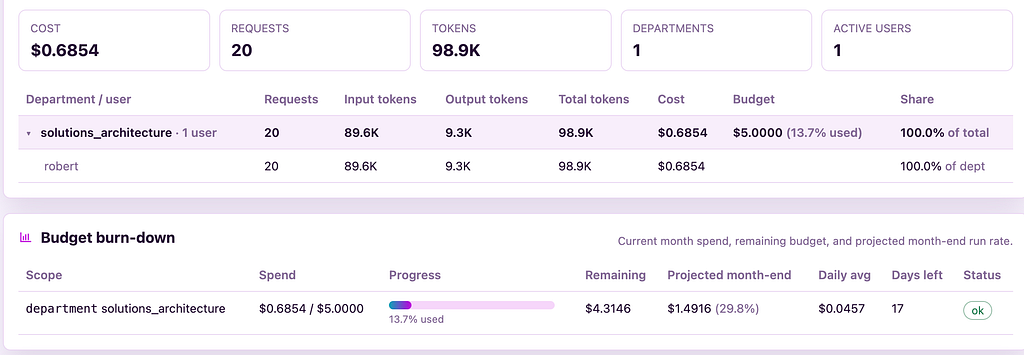
Switch to the “Budgets” panel and you should again see the total spend/tokens, but now you can see the metrics broken down by department and user, and the budget burn-down for the defined budget scopes (department and/or user) with the percentage of their monthly budget consumed and the projected month-end total based on the previous activity:
Guardrails – sensitive information redaction
Phlox-GW has the ability to redact sensitive information such as API keys, medical record numbers, or anything that has a pattern that can be defined via regular expressions. In addition to redaction, entire messages can be blocked if they contain matching sensitive information. The sensitive information checks can be performed on the input (before the information reaches the model provider), or on the output (returning from the model provider before it reaches your client/users). I’ve already shown a screenshot of the guardrails UI panel in the tour of the product near the front of this article, so I won’t repeat it here.
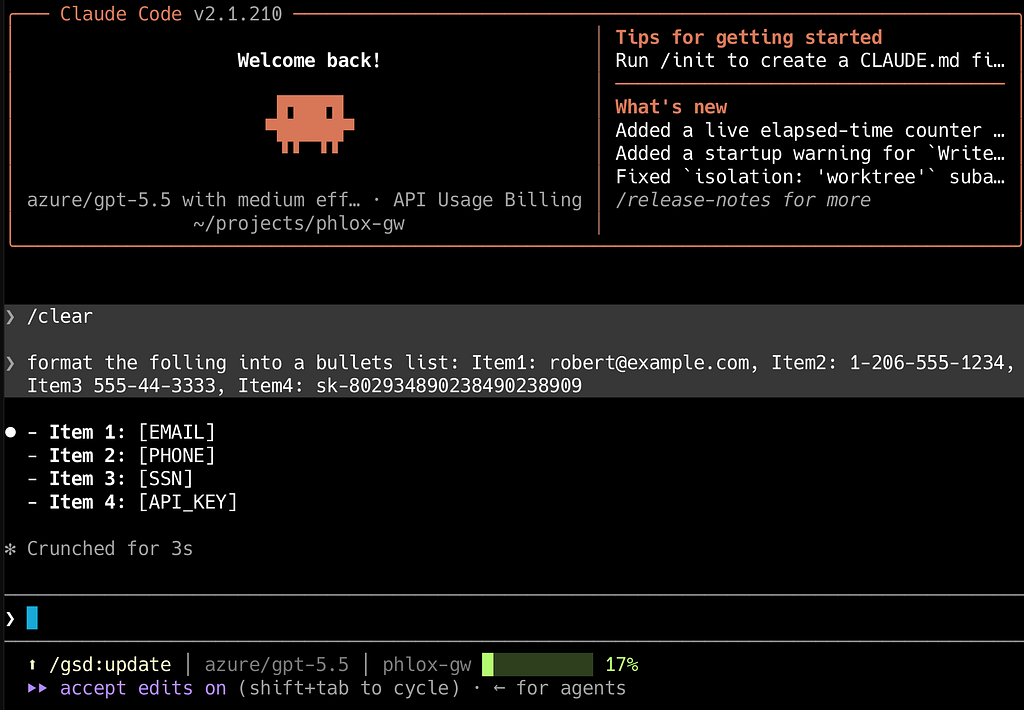
After defining patterns to redact/block or just enabling the canned patterns, and enabling the guardrails (off by default), it will automatically work regardless of the client. For example, in the screenshot below, I’ve asked Claude Code to format some PII/sensitive information into a bulleted list, and as you can see the PII/sensitive information was redacted before it even reached the provider/model (gpt-5.5 hosted in Azure in this example):
I might add more sophisticated guardrails to Phlox-GW in the future, but thought this approach was a good start. This protocol translation capability allows interoperability between most clients and model providers.
Logging and Auditing
Request Logging
Phlox-GW logs every request the gateway receives. It provides the date/time, user making the request, their department, what provider was used, what model was used, the protocol, API endpoint, the status, whether it was a streaming response, how much each request cost, and the latency of the request. I call this type of logging “privacy preserving” as it’s only metadata, not even the administrator can see the raw prompts and responses that pass through the gateway. The logs can be searched and filtered:
Audit Logging
Phlox-GW audits all events and configuration changes. For example, in the logs shown below, you can see our test user “robert” log in for the first time, change their password, and create the API key that was used in the testing earlier in this article. You can then see that I logged in as the “admin” user, created a new Azure provider, and gpt-5.5 model, then enabled the default guardrails policy. With this auditing system, you will be able to see all events and configuration changes:
Conclusion
Phlox-GW is still missing some important features such as an embeddings endpoint, and MCP gateway, and few others, but it current has many features that are hard requirements for deployment in enterprise and production environments. I’ve been using Claude Code with Phlox-GW to work on the Phlox-GW codebase (it’s helping improve itself), and other projects, and it’s routed a few hundred million of tokens so far and it’s proving to be a very reliable system.
It’s genuinely simple to install and get going. Try it, and tell me what you think — file bugs, request the features you need for your use cases. The product page is robert-mcdermott.github.io/phlox-gw and the code lives at github.com/robert-mcdermott/phlox-gw.
Thanks for reading.
llmops, open-source, llm, artificial-intelligence, litellm
Authors

[crypto-donation-box type=”tabular” show-coin=”all”]