vLLM is designed for high-throughput scenarios, while Ollama emphasizes day-to-day simplicity and good-enough performance for most use cases.
Background
I’m a fan of Ollama because it’s surprisingly user-friendly. It runs on Linux, Windows, and macOS, and its Docker-style CLI (pull, run, list, ps, push, rm) makes it feel familiar. It supports NVIDIA, Apple-Silicon/Metal, and even AMD Radeon GPUs, and offers a library of ready-to-use models curated by both the core team and the community. An OpenAI-compatible REST API endpoint lets any script or framework that allows you to override the base URL integrate with it. Whether you’re tinkering on a laptop or running pipelines on a multi-GPU server, you can have local generative-AI services up in minutes.
I’ve used Ollama for many of my projects that need on-prem LLM inference. Because I access it exclusively through its OpenAI-compatible API, I can switch it out for another backend, vLLM for example, or a commercial model simply by updating the base URL variable to point at proxies like LiteLLM or OpenRouter.
That said, vLLM has been on my radar for its reputation in high-throughput scenarios, and I’ve received suggestions that I give it a try. In this article I’ll install vLLM, run inference, and conduct performance benchmarks comparing it head-to-head against Ollama.
Introduction to vLLM

- Source Code: https://github.com/vllm-project/vllm
- Documentation: https://docs.vllm.ai/en/stable/
vLLM, like Ollama, lets you run large-language models on your own hardware, crucial when privacy, compliance, or maintaining full control over your data is required. It isn’t as user friently as Ollama, but it can deliver significantly higher throughput. The maintainers call it “a fast and easy-to-use library for LLM inference and serving.” The performance optimization is reportedly due to the following features:
- PagedAttention for efficient key/value memory management
- Continuous batching of incoming requests
- Speculative decoding and chunked prefill
- Parallel sampling, beam search, and related techniques
- Tensor and pipeline parallelism for multi-GPU or distributed nodes
- Prefix caching
vLLM also exposes an OpenAI-compatible API endpoint, so any script or framework that can override the OpenAI base URL will work with it just as easily as with Ollama.
Installing vLLM
⚠️ Note: To use vLLM, you’ll need a system with a GPU; preferably a modern NVIDA GPU, with CUDA support. vLLM doesn’t support running on CPU like Ollama does. ❌ vLLM Also currently doesn’t support Apple Silicon GPUs (Metal/MPS)
Installing vLLM is very simple if you have a modern version of Python on your system. In the following examples, I’ll be using UV to create Python virtual environments, install packages and run vLLM.
The first step is to create a new Python virtual environment for vLLM. In this example we’ll create a new environment named vllm-srv. Execute the following commands:
mkdir vllm-srv
cd vllm-srv
uv venv --python 3.12 --seed

Using CPython 3.12.10
Creating virtual environment with seed packages at: .venv
 + pip==25.1.1
Now install the vLLM package and all of its dependencies with the following commands:
uv pip install vllm

Resolved 145 packages in 67ms
Installed 145 packages in 303ms
That’s it! It’s installed and we are ready to download our first model and run it.
Selecting a model, downloading and running it
Go to HuggingFace and find a model that you want to run. In the example below, I’m going to download and run the “Qwen/Qwen3–14B” model which will require at least 30GB of GPU VRAM to be able to load. If you don’t have that much VRAM, select a smaller model such as Qwen/Qwen3–1.7B which only needs 4GB of VRAM to load and run.
Run the command shown on the first line below, substituting “Qwen/Qwen3–14B” for the model that you chose, such as “Qwen/Qwen3–1.7B” for a system with a small GPU:
uv run vllm serve Qwen/Qwen3-14B --host 127.0.0.1 --port 8000

INFO 05-23 01:33:21 [__init__.py:239] Automatically detected platform cuda.
INFO 05-23 01:33:32 [api_server.py:1043] vLLM API server version 0.8.5.post1
...
INFO 05-23 01:34:23 [gpu_model_runner.py:1329] Starting to load model Qwen/Qwen3-14B...
INFO 05-23 01:34:23 [weight_utils.py:265] Using model weights format ['*.safetensors']
Loading safetensors checkpoint shards:   0% Completed | 0/8 [00:00<?, ?it/s]
Loading safetensors checkpoint shards:  12% Completed | 1/8 [00:00<00:02,  2.53it/s]
Loading safetensors checkpoint shards:  25% Completed | 2/8 [00:00<00:02,  2.19it/s]
Loading safetensors checkpoint shards:  38% Completed | 3/8 [00:01<00:02,  2.10it/s]
Loading safetensors checkpoint shards:  50% Completed | 4/8 [00:01<00:01,  2.06it/s]
Loading safetensors checkpoint shards:  62% Completed | 5/8 [00:02<00:01,  2.06it/s]
Loading safetensors checkpoint shards:  75% Completed | 6/8 [00:02<00:00,  2.05it/s]
Loading safetensors checkpoint shards:  88% Completed | 7/8 [00:03<00:00,  2.03it/s]
Loading safetensors checkpoint shards: 100% Completed | 8/8 [00:03<00:00,  2.33it/s]
INFO 05-23 01:34:27 [loader.py:458] Loading weights took 3.72 seconds
INFO 05-23 01:34:27 [gpu_model_runner.py:1347] Model loading took 27.5185 GiB and 4.229864 seconds
...
INFO 05-23 01:36:21 [api_server.py:1090] Starting vLLM API server on http://127.0.0.1:8000
...
INFO:     Waiting for application startup.
INFO:     Application startup complete.
It might take a while for the model to download (it puts all models it downloads in your ~/.cache/huggingface/hub/ directory), load the weights and start the server. There was a lot more logs generated during this process than shown above, so removed several lines for brevity. You’ll know it’s ready to use when you see “Application startup complete”.
Listing the loaded model
To verify that it’s working, you can use curl against the OpenAI API endpoint to list the models to ensure that your selected model is listed. Run the following command shown on the first line and observe the output:
 curl -s http://localhost:8000/v1/models

{
  "object": "list",
  "data": [
    {
      "id": "Qwen/Qwen3-14B",
      "object": "model",
      "created": 1747965054,
      "owned_by": "vllm",
      "root": "Qwen/Qwen3-14B",
      "parent": null,
      "max_model_len": 40960,
      "permission": [
        {
          "id": "modelperm-c31e5036d1454ba9ad7d34a2a3939b6d",
          "object": "model_permission",
          "created": 1747965054,
          "allow_create_engine": false,
          "allow_sampling": true,
          "allow_logprobs": true,
          "allow_search_indices": false,
          "allow_view": true,
          "allow_fine_tuning": false,
          "organization": "*",
          "group": null,
          "is_blocking": false
        }
      ]
    }
  ]
}
We can see that the model that I selected has been downloaded and is ready to be used with vLLM.
Running inference against vLLM
Now that vLLM is installed, a model has been downloaded and the vLLM server is up and running with a model, we can run interference against it. Here again we’ll use curl to access the OpenAI compatible endpoint. Execute the command shown in the first multi-line command below, substituting the name of the model you are running:
curl -s http://localhost:8000/v1/chat/completions
    -H "Content-Type: application/json"
    -d '{
        "model": "Qwen/Qwen3-14B",
        "messages": [
            {"role": "system", "content": "You are a helpful assistant."},
            {"role": "user", "content": "Why is the sky blue? /no_think"}
        ]
    }'

{
  "id": "chatcmpl-8de97f67fe47489793ca09f3f250ac51",
  "object": "chat.completion",
  "created": 1747965331,
  "model": "Qwen/Qwen3-14B",
  "choices": [
    {
      "index": 0,
      "message": {
        "role": "assistant",
        "reasoning_content": null,
        "content": "<think>nn</think>nnThe sky appears blue due to a phenomenon called **Rayleigh scattering**. Here's a simple explanation:nnWhen sunlight enters Earth's atmosphere, it collides with molecules and small particles in the air. Sunlight is made up of different colors, each with different wavelengths. Blue light has a shorter wavelength and is scattered more easily than colors like red or yellow, which have longer wavelengths.nnThis scattering of blue light happens in all directions, so when you look up at the sky, you're seeing this scattered blue light coming from all around you. That's why the sky appears blue during the day.nnHowever, during sunrise or sunset, the sky often appears red or orange. This is because the sunlight has to pass through more of the atmosphere at those times, scattering out the blue light and leaving the longer wavelengths (reds and oranges) to dominate.nnIn summary: **The sky is blue because blue light is scattered more by the atmosphere than other colors.**",
        "tool_calls": []
      },
      "logprobs": null,
      "finish_reason": "stop",
      "stop_reason": null
    }
  ],
  "usage": {
    "prompt_tokens": 29,
    "total_tokens": 226,
    "completion_tokens": 197,
    "prompt_tokens_details": null
  },
  "prompt_logprobs": null
}
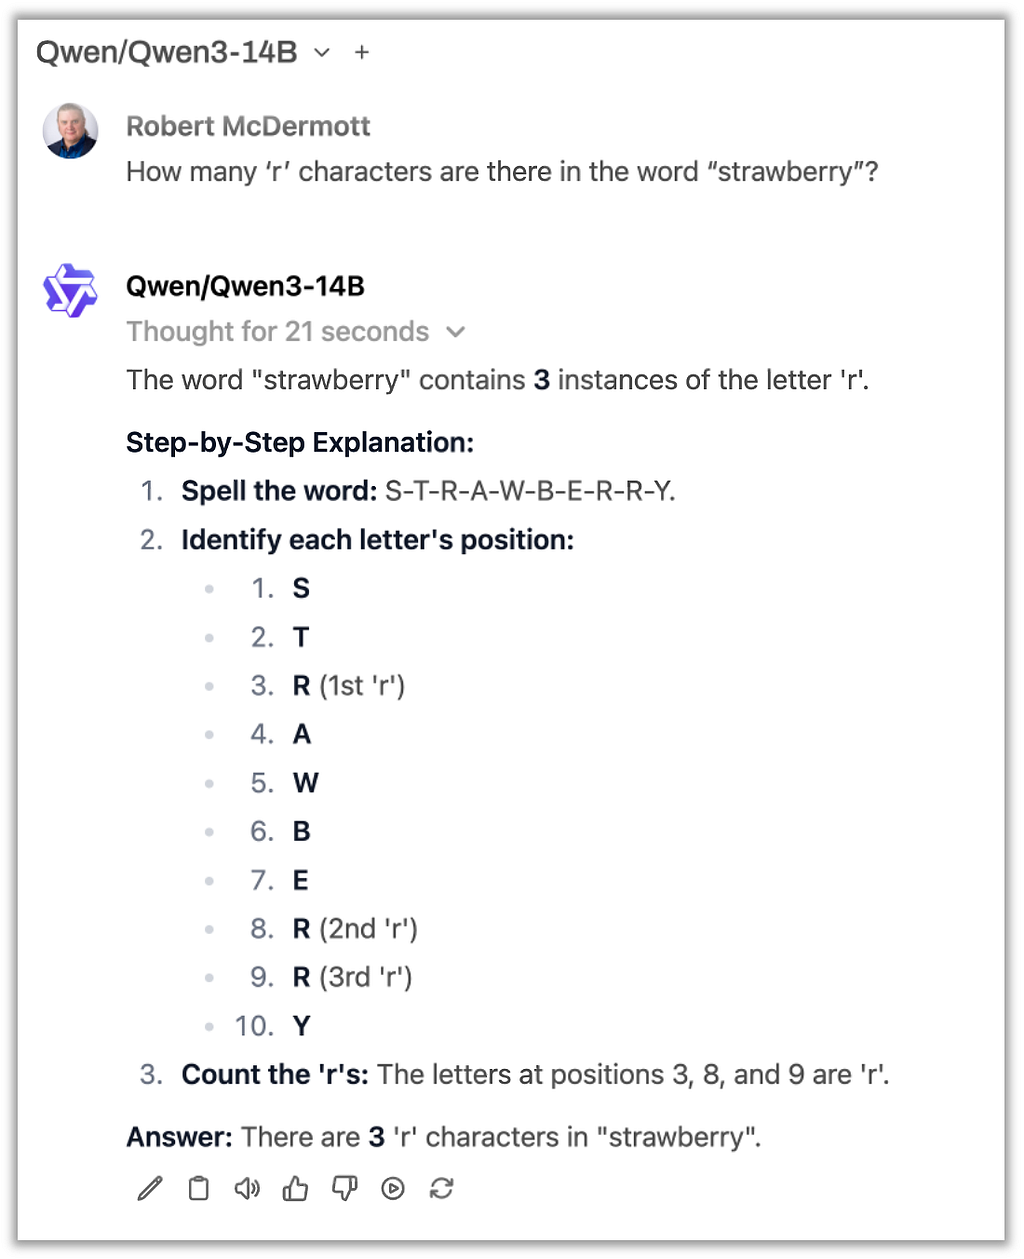
💡 Note: the Qwen3 models are “thinking” models that put their internal monologue between “<think></think>” tags that are part of the response. To turn thinking mode off, Qwen3 models support a “/no_think” soft-switch that can be provided as part of the prompt. The thinking mode can be very verbose (lots of tokens slowing down the response) so turning it off is a good idea if you don’t need it.
If you saw a response to your prompt in the ‘content’ field of the json response, then it’s working!
⚠️ Note: The first time I used vLLM, I tried it with the tiny ‘Qwen/Qwen3–1.7B’ model but was shocked to when I ran nvidia-smi to check the VRAM utilization and discovered that it was using 44GB of the 48GB total VRAM in the NVIDIA A6000 GPU that I was using. At first I thought that I had done something wrong, but after some investigation I discovered that behavior was by design. vLLM will automatically allocate 90% of the VRAM of the GPU(s) that it’s running on to optimize performance. I also discovered that you can use the –gpu-memory-utilization flag when starting the vLLM server to tell it how much VRAM to allocate. For example 0.3 would allocate 30% of the VRAM to run the model. Unless you have other services that need to use the GPU at the same time that vLLM does, it’s best to just let vLLM take over all of the GPU.
Integrating vLLM with Open WebUI
If you’d rather interact with vLLM models via a web based chat UI than via curl or Python scripts. Open WebUI is an excellent choice. Execute the following commands to create an new Python virtual environment and install Open WebUI:
mkdir open-webui-srv
cd open-webui-srv
uv venv --python 3.12 --seed
uv pip install open-webui
That will download the package and all the dependencies it needs to run. After all the packages are installed, you can just start it up and start using it. Run the following command:
WEBUI_AUTH=False uv run open-webui serve
⚠️ Note: The WEBUI_AUTH=False part of the above command sets an environment variable that tells Open WebUI to disable user authentication. By default, Open WebUI is a multi-user web application that requires user accounts and authentication, but we are just setting it up for personal use, so we are disabling the user authentication layer.
After Open WebUI is up and running, open up a new web browser tab and navigate to the following URL:
http://127.0.0.1/8080
To use vLLM with Open WebUI, you’ll need to add it as an OpenAI server. In Open WebUI, navigate to “Admin Settings” -> “Settings” -> “Connections”. Enable “OpenAI API” and add a new connection as shown below (http://localhost:8000/v1, with a API key of sk-1234):

Since we didn’t define an API key when startring vLLM, you can use anything for an api key, in this example I just used sk-1234
⚠️ Note: Since we have bound the vLLM server to 127.0.0.1 (localhost), it’s not remotely accessible, so setting an API key is optional. If you are going to serve up the vLLM OpenAI API endpoint so remote clients can connect to it, make sure that you’ve set and API key and are protecting the traffic with TLS encryption.
To use your vLLM model via Open WebUI, create a new chat and select your model if it’s not already selected, and chat with it like you would any AI chat app such as ChatGPT:
That’s it, at this point you have vLLM setup and are ready to explore and make use of it for you projects.
Ollama vs. vLLM performance comparison
vLLM is reportedly highly performance optimized and more suitable for demanding production workloads, serving many concurrent sessions. In this section we are going to conduct some simple benchmarking to compare the multi-GPU, single-node performance with increasing levels of concurrent sessions and measure the throughput and response latency between Ollama and vLLM, using the same hardware and same LLM model.
System Details
The system I’m going to be conducting this testing on is a modern server with high-performance components and two professional class GPUs:
- (2) AMD EPYC 7343 16-Core Processor (32 physical cores, 64 threads)
- 256GB DDR5 RAM
- 8TB NVMe RAID10 Storage
- (2) NVIDIA A6000 48GB VRAM with NVLink (96GB VRAM total)
The LLM Selection
I’ve chosen the Qwen3 14B model to use in this testing. vLLM typically uses BF16 (half precision), “safetensors” formatted models, while Ollama typically uses 4 or 8 bit quantized models in GGUF format. To keep this comparison as close to apples-to-apples as possible, I’ll be using the “qwen3:14b-fp16” model, which is a FP16/half-precision version of Qwen3 14B from Ollama’s official library. Both models are 28GB in size (on-disk).
- vLLM model: https://huggingface.co/Qwen/Qwen3-14B
- Ollama model: https://ollama.com/library/qwen3:14b-fp16
⚠️ Note: There are subtle differences between FP16 and BF16 in how their bits mask range and precision (FP16 has more precision, while BF16 more range), these differences might influence the content of the responses to some small degree, but it would have no impact on performance, what we are measuring in this section. See bf16-vs-fp16 for more information.
vLLM Server Configuration:
The following command will start vLLM using our selected model, make both GPUs visible to vLLM and tell it to parallelize the workload across both GPUs:
CUDA_VISIBLE_DEVICES=0,1 uv run vllm serve Qwen/Qwen3-14B
  --tensor-parallel-size 2
  --host 127.0.0.1
  --port 8000
Ollama Server Configuration:
The following command will start Ollama, making both GPUs visible to it, telling it to spread it’s workload across the GPUs and that it can run 32 simultaneous threads.
OLLAMA_SCHED_SPREAD=1 CUDA_VISIBLE_DEVICES=0,1 OLLAMA_NUM_PARALLEL=32 ollama serve
⚠️ Note: You can’t have both vLLM and Ollama running at the same time. The above configurations require that they both independently have exclusive access to the GPUs.
⚠️ Note: Also worth noting that that the value of ‘32’ for number off parallel Ollama threads was found via trial and error; I kept increasing the number until it used most of the available GPU VRAM, without spilling over into the CPU (see below):
ollama ps

NAME              ID              SIZE     PROCESSOR    UNTIL
qwen3:14b-fp16    c1adf350f07c    90 GB    100% GPU     4 minutes from now
The Benchmarking Utility
To test the performance of these servers under and increasing workload, I’ve created a simple utility that takes leverages the OpenAI API, that both vLLM and Ollama support. The benchmarking utility is available here: https://github.com/robert-mcdermott/openai-llm-benchmark
The script can be easily installed (using uv) with the following commands:
# Clone the repository
git clone https://github.com/robert-mcdermott/openai-llm-benchmark.git
cd openai-llm-benchmark

# Install dependencies
uv sync
Benchmarking command used with vLLM:
uv run openai-llm-benchmark.py
  --base-url http://127.0.0.1:8000
  --model Qwen/Qwen3-14B --requests 1000
  --concurrency 1 --max-tokens 100
  --prompt "What is the capital of Washington state in the USA?  /no_think"
Benchmarking command used with Ollama:
uv run openai-llm-benchmark.py
  --base-url http://127.0.0.1:11434
  --model qwen3:14b-fp16 --requests 1000
  --concurrency 1 --max-tokens 100
  --prompt "What is the capital of Washington state in the USA?  /no_think"
Example output of this utility looks like this (vllm with 128 concurrent requests):
✔ 1000/1000 requests succeeded in 14.15s
Requests/s:          70.69
Tokens/s:          3110.37
Avg latency:         1.754s
p50 latency:         1.652s
p95 latency:         2.482s
The Benchmark Test
The configuration parameters and benchmarking utility with the parameters provided above, were run against each sever (vLLM then Ollama) multiple times with an increase of concurrency each iteration with the following amounts of concurrency provided via the –concurrency flag:
Concurrency increments: 1, 2, 4, 8, 16, 32, 64, 128, 256, 512, 768, 1000
Benchmark Results
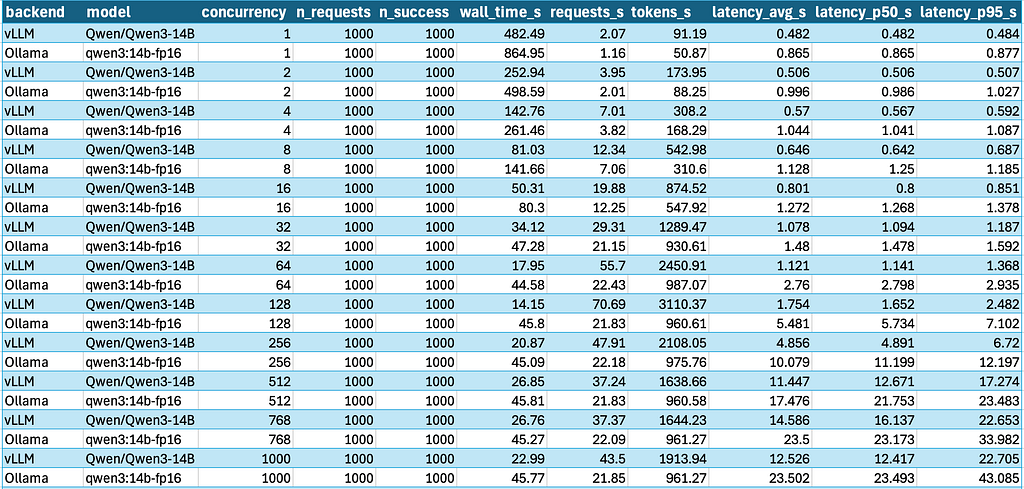
After running the benchmark which each concurrency for both servers and capturing the data, the complete results are shown in the table below:
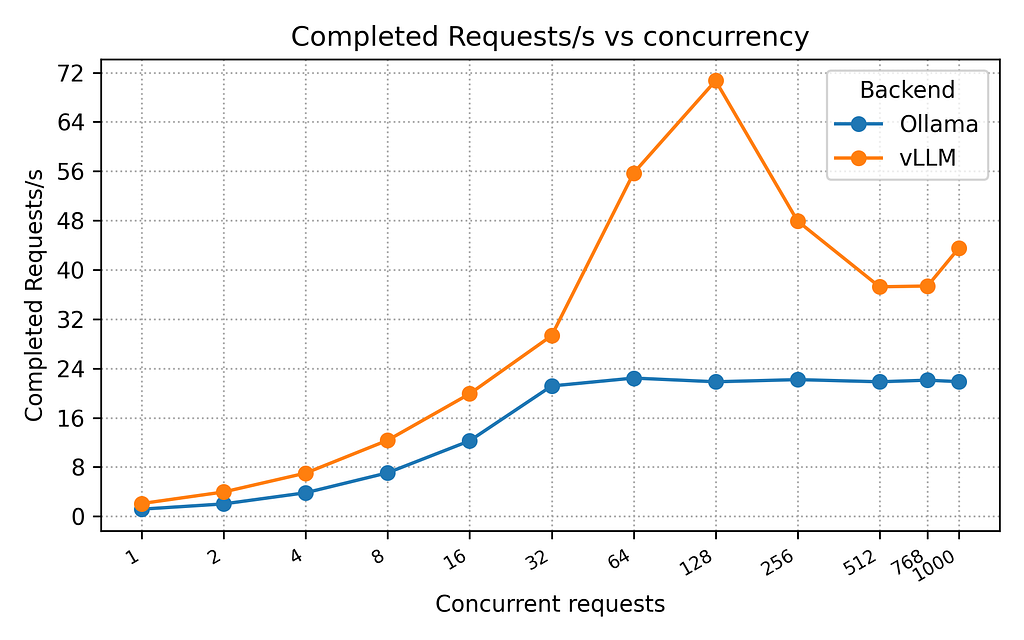
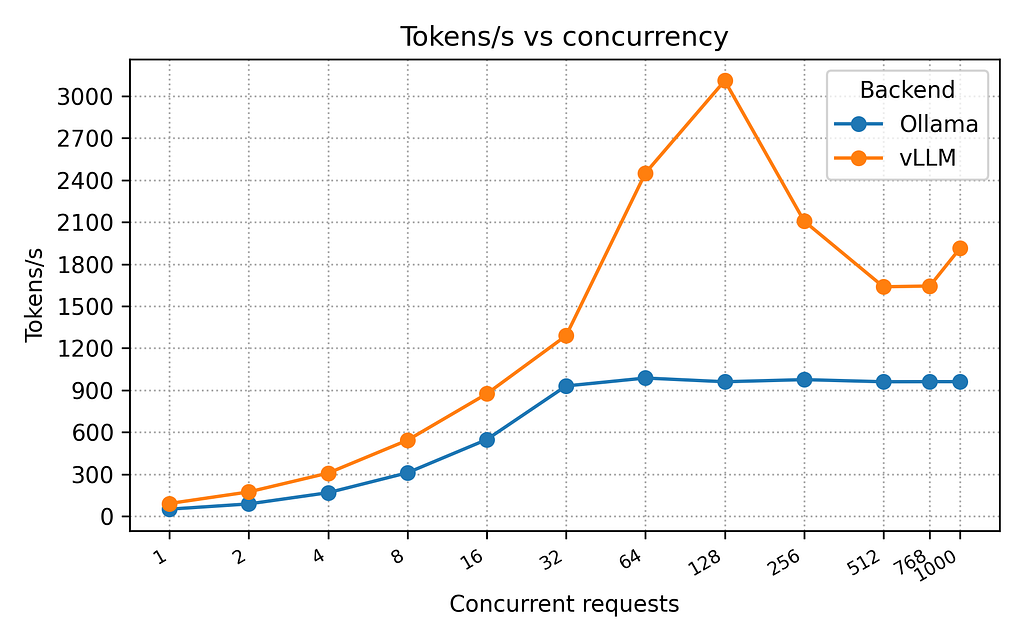
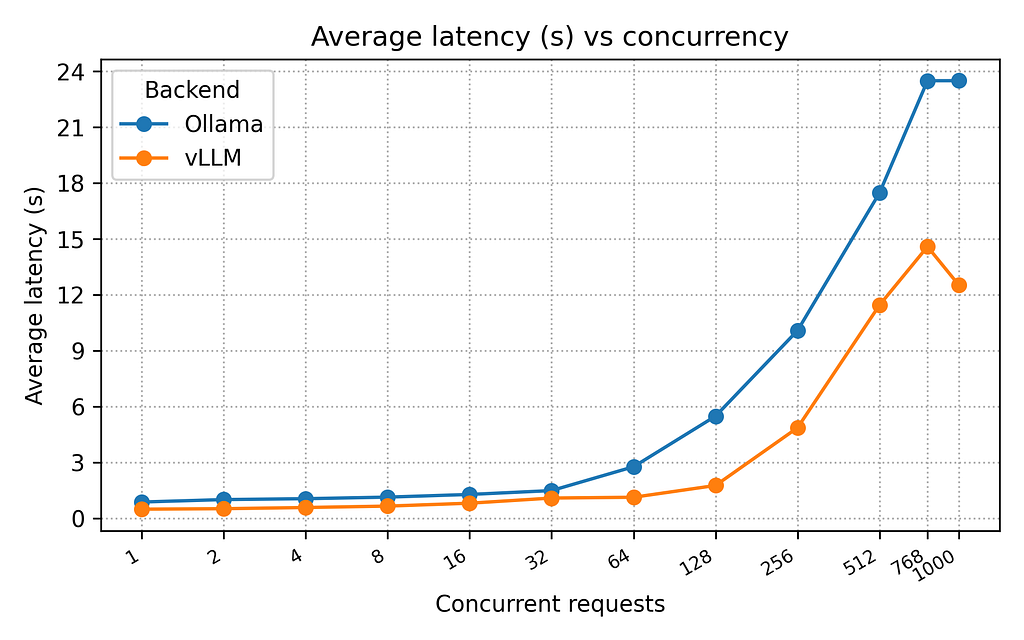
The following charts show the performance of vLLM compared to Ollama for completed request per second, tokens per second, and latency across all the levels of concurrency:
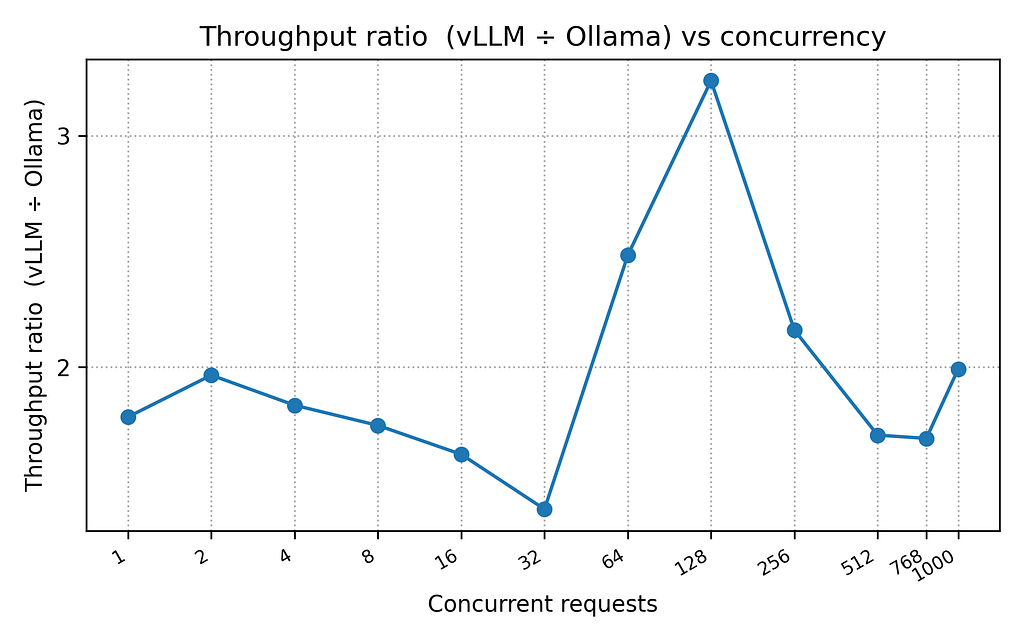
The following chart shows the performance ratio between vLLM and Ollama. vLLM consistency performed better than Ollama, and reached 3.23x times faster at one point with a concurrency level of 128:
Benchmarking Thoughts
I had expected vLLM to perform better than Ollama, and it consistency did in every metric (throughput and latency). On this system and with the provided configuration, vLLM performed up to 3.23x times faster than Ollama with 128 concurrent requests. Ollama ramped up to ~22 requests per second with 32 concurrent requests and stayed flat at that level across the rest of the tests. Adding more concurrent requests beyond 32 with Ollama only resulted in increased latency. I was actually surprised that Ollama performed as well as it did. I was expecting worse performance, and even possiblely throwing errors. Just to be sure everything was working correctly, I added the–capture-responses feature to my benchmarking utility and ran some of the high concurrency tests again, and examined the responses. All responses were successful and the LLM provided valid responses. So while Ollama is inferior to vLLM in raw performance, it might be “good enough” for many (or most) of your use cases.
vLLM vs Ollama Comparison
Benefits of Ollama:
- Ease of installation: Installers provided, no Python required
- Broad OS support: Windows, macOS, Linux
- Curated model library: Central library of official and community provided models, ready to fetch with ollama pull (can also pull models from HuggingFace).
- Custom model creation: Create customized models with ollama create
- Broader GPU hardware support: Apple (metal), AMD & NVIDIA
- CPU support: Can run inference completely on CPU if you don’t have a GPU, or hybrid GPU+CPU if you don’t have enough VRAM to load a model completely in the GPU.
- Quantized model support: Runs GGUF formatted quantized models to reduce VRAM requirements, but also supports half-precision BF16 models if desired.
- On-demand model switching: You can select, switch and run models on-demand after the Ollama server is running (vLLM requires stopping and restarting the vLLM server to change models).
Benefits of vLLM:
- Higher performance than Ollama
- Lower latency responses than Ollama
- Better scalability than Ollama
- Ability to scale to multiple nodes by creating “ray” clusters. 🚀
Conclusion
When raw performance matters, vLLM wins, but Ollama often wins on everything else.
My benchmarks showed vLLM delivering up to 3.2x the requests-per-second of Ollama on identical hardware, with noticeably lower latency at high concurrency. If you’re building a service that must:
- Serve hundreds of simultaneous chats
- Drive real-time analytics or retrieval-augmented pipelines
- Keep multiple high-end GPUs saturated around the clock
Then vLLM’s optimizations, PagedAttention, continuous batching, speculative decoding and tensor/pipeline parallelism are clutch. In those cases you should invest in the extra complexity of vLLM.
For everything short of that, Ollama is hard to beat. It installs in minutes, runs on laptops or workstations, supports CPU fallback, and provides a curated model hub plus on-the-fly model switching. If your typical load is a handful of concurrent users, batch jobs that can wait an extra second, or local exploration during development, Ollama’s “good-enough” performance is exactly that, good enough.
Ollama is the reliable daily driver that gets almost everyone where they need to go; vLLM is the tuned engine you unleash when the freeway opens up and you really need to fly.
What’s next
After reading the vLLM documentation, I became aware that in addition to multi-GPU support, it’s possible to build a multi-node vLLM cluster using “ray” for horizontal scaling. I may experiment with that in the future.
vllm, ollama, mlops, genai, llm-performance
Author
[crypto-donation-box type=”tabular” show-coin=”all”]